


Genius Press Brake Operation can be challenging, but this tutorial will guide you through operating the DA-66T and DA-69T models to achieve optimal performance and precision.
Learn how to operate the Genius Press Brake (DA-66T and DA-69T) with this comprehensive guide. Follow our step-by-step instructions to enhance your bending process and achieve perfect results.
Ready to get started? Let’s explore the operation process for the DA-66T and DA-69T to ensure smooth, efficient bending operations.
New customers will usually have various problems when using our Genius Press Brake for the first time. HARSLE engineers have recorded a complete operating tutorial of the Genius Press Brake DA-66T and DA-69T to ensure customers could use machine faster and better. This tutorial records from oil injection process to bending programming, with complete contents and clear details. We hope the following video are helpful to you:
Part 1: Fill The Oil and Cable Connections
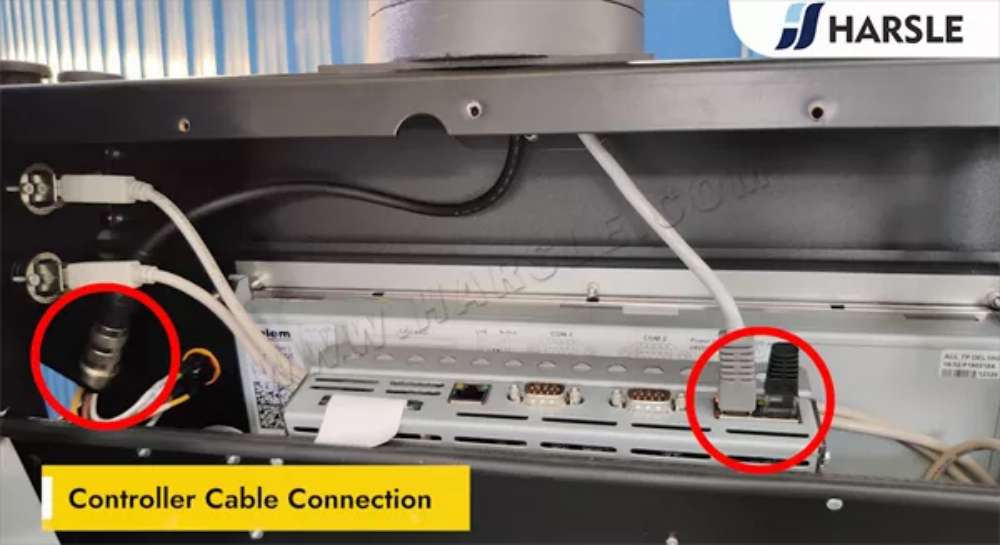
Controller Cable Connection
Proper controller cable connection is essential for ensuring stable communication between the Genius Press Brake and the DA-66T or DA-69T CNC controller. Start by verifying the cable type and matching it with the corresponding input ports on both the controller and the press brake. Secure all connections tightly to prevent signal loss or machine errors. Use shielded cables to minimize electromagnetic interference. After connection, run a system test to confirm proper data transmission. Regularly inspect and maintain cables to prevent wear and tear, ensuring long-term performance and reliability. Proper wiring guarantees seamless press brake operation and precise bending results.
Filling The Oil Tank with Anti-Wear Hydraulic Oil
Filling the oil tank with anti-wear hydraulic oil is a crucial step to ensure the smooth operation and longevity of your Genius Press Brake. Before filling, make sure the tank is clean and free of contaminants. Use only high-quality anti-wear hydraulic oil recommended by the manufacturer. Slowly pour the oil into the tank, ensuring it reaches the required level without overfilling. After filling, check for any leaks and allow the system to run for a few minutes to ensure proper circulation. Regular oil checks and replacements help maintain optimal performance and prevent premature wear of hydraulic components.

Fill The Oil from This Port
To ensure optimal performance and longevity of your press brake, it is crucial to fill the hydraulic oil correctly. Use the designated oil port to add hydraulic oil, ensuring it reaches 2/3 of the total oil volume level. Overfilling or underfilling may lead to system inefficiencies, overheating, or reduced machine lifespan. Always use high-quality hydraulic oil recommended by the manufacturer. After filling, check the oil level indicator and ensure there are no leaks. Regular maintenance and proper oil management will help keep your Genius Press Brake running smoothly and efficiently for years to come.

Connect The Machine to Power Source
Before operating the Genius Press Brake, ensure a safe and correct power connection. Start by verifying that the power specifications of the machine match your facility’s electrical supply. Use a certified electrician to connect the machine to a stable three-phase power source, following local safety regulations. Ensure that the grounding wire is securely connected to prevent electrical hazards. After powering on, check for any error messages on the DA-66T or DA-69T controller. If everything runs normally, you’re ready to proceed with calibration and setup. Always follow manufacturer guidelines to ensure a safe and efficient operation.
Connect The Cable to The Electrical Box
Connecting the cable to the electrical box is a crucial step to ensure safe and efficient operation of your press brake. Start by turning off the main power supply to prevent any electrical hazards. Carefully strip the cable ends and insert them into the designated terminals inside the electrical box. Secure the connections by tightening the screws and ensuring proper grounding. Double-check that all wires are correctly placed according to the wiring diagram. Once everything is secured, close the electrical box cover and restore power to test the connection. A proper installation guarantees safety and machine stability.
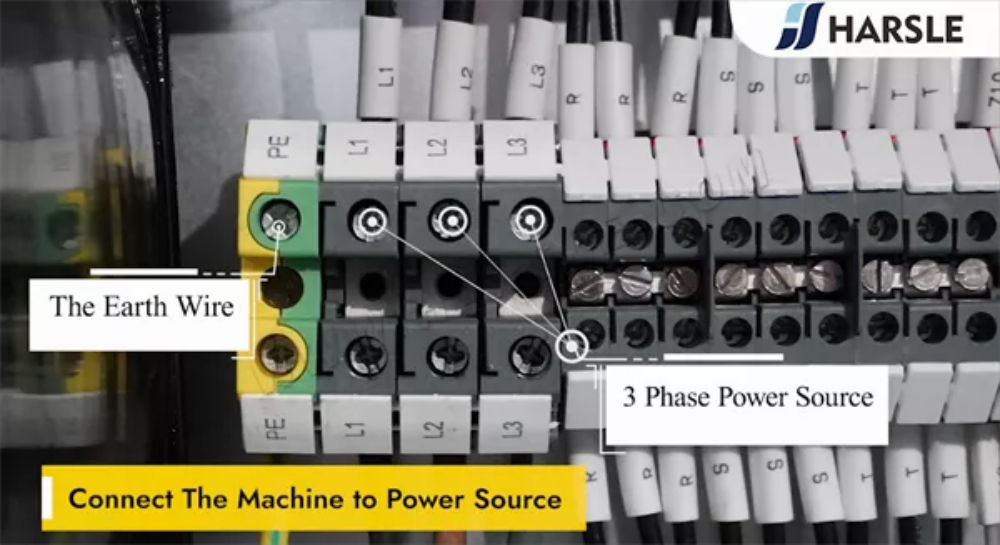
Connect The Earth Wire
Connecting the earth wire is a crucial step in ensuring electrical safety in any machine, including press brakes. The earth wire provides a direct path for stray electrical currents to flow safely into the ground, preventing electric shocks, short circuits, and potential fire hazards. Without proper grounding, electrical leakage can cause serious harm to operators and damage machine components. Always use a high-quality, properly rated earth wire and connect it to a reliable grounding point. Regularly check the connection to ensure it remains secure and effective. A well-connected earth wire enhances workplace safety and prolongs machine lifespan.
Connect To 3 Phase Power Source
Properly connecting your Genius Press Brake to a 3-phase power source is essential for ensuring stable operation and preventing electrical issues. Before starting, verify the power specifications on the machine’s nameplate and confirm they match your facility’s voltage and frequency. Use appropriately rated cables and ensure a secure ground connection for safety. Connect the three-phase wires correctly to the designated terminals, following the wiring diagram provided in the manual. After installation, check for correct phase rotation; incorrect wiring may cause the machine to operate in reverse. Always have a qualified electrician handle the connection to ensure compliance with local regulations.

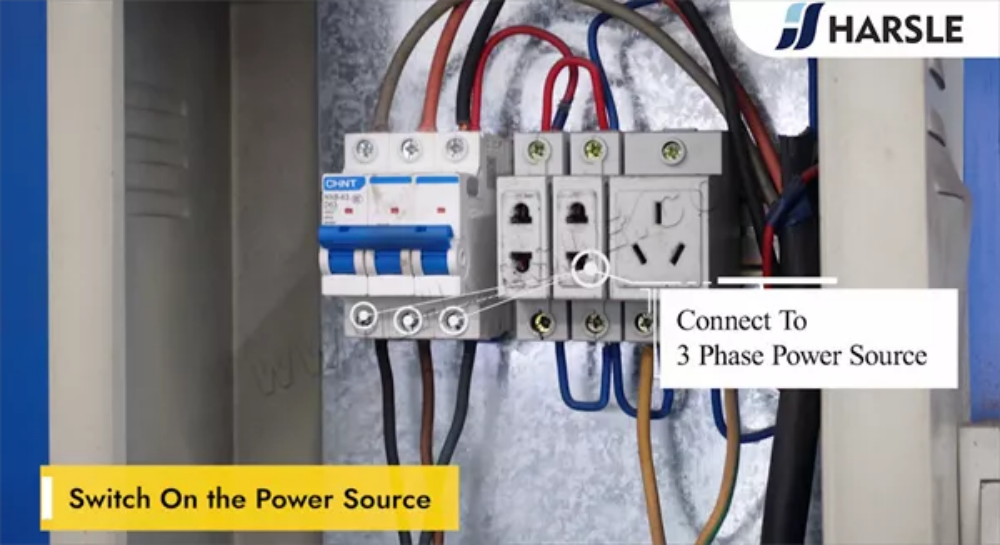
Switch On the Power Source
Before operating the Genius Press Brake, ensure a stable power supply. First, check that the main power switch is in the OFF position before connecting to the power source. Verify that the voltage matches the machine’s requirements to prevent electrical issues. Once confirmed, turn the main power switch ON and wait for the system to initialize. The controller display will light up, indicating the machine is ready for operation. Always inspect the emergency stop button and safety circuits before proceeding to ensure smooth and safe operation. Proper startup ensures efficiency and extends the machine’s lifespan.
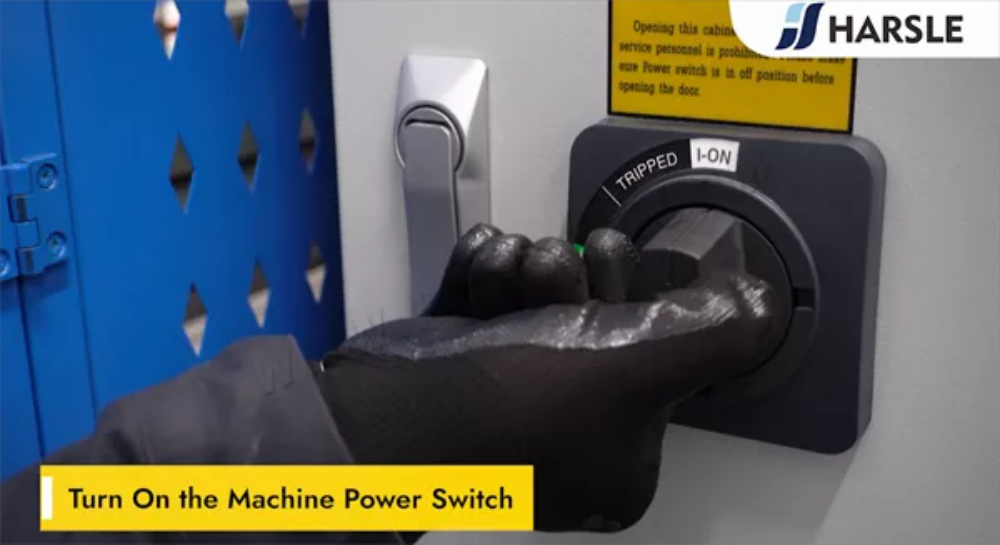
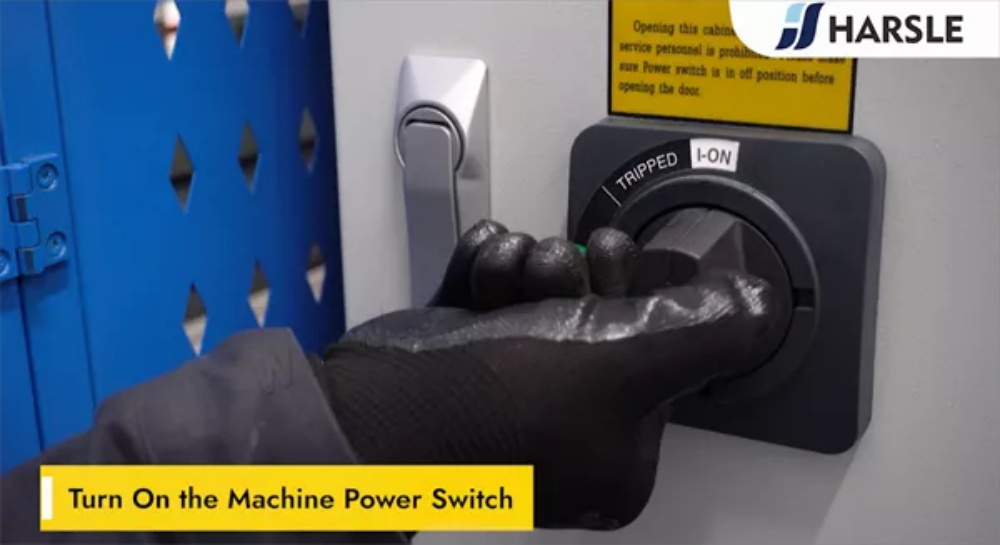
Turn On the Machine Power Switch
To begin operating the Genius Press Brake, the first step is to turn on the machine power switch. Locate the main power switch on the side or rear panel of the machine. Ensure that the power supply is stable and the emergency stop button is not engaged. Rotate the power switch to the ON position, and wait for the system to initialize. The control panel will display startup information, indicating that the machine is ready for operation. Always follow safety protocols before powering on to prevent electrical issues or accidental movement of the press brake.
Waiting For the System Loading
When operating a CNC press brake, the message “Waiting for the System Loading” appears during the boot-up process. This indicates that the controller is initializing essential functions, loading system configurations, and preparing for operation. Depending on the DA-66T or DA-69T system, this process may take a few seconds to a couple of minutes. Avoid interrupting the startup to prevent system errors. If the loading takes longer than usual, check for possible software updates or system malfunctions. Ensuring a stable power supply and proper maintenance can help minimize delays during system loading, keeping your bending operations smooth and efficient.

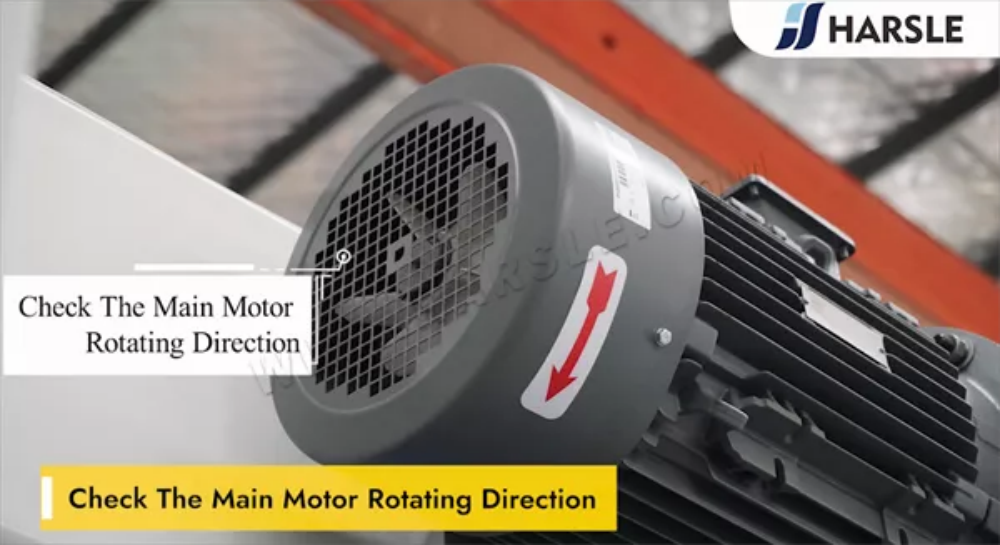
Check The Main Motor Rotating Direction
Ensuring the correct main motor rotating direction is crucial for the proper operation of your Genius Press Brake. Incorrect motor rotation may lead to machine malfunctions or even damage to internal components. To check the rotation:
- Power On the Machine – Ensure all safety measures are in place.
- Observe the Motor Rotation – Check the motor’s directional arrow and compare it with the actual movement.
- Adjust Wiring if Necessary – If the rotation is incorrect, swap two power supply phases.
- Test Again – Restart and confirm the correct direction.
Pull Down the Soft Buttons
The “Pull Down the Soft Buttons” function on the DA-66T and DA-69T controllers allows operators to access additional interface options for enhanced press brake control. By tapping on the screen and dragging the soft buttons downward, users can reveal hidden functions such as bending corrections, axis settings, and tool adjustments. This feature improves workflow efficiency, allowing quick modifications without navigating multiple menus. Mastering this function ensures smoother operation and faster production cycles, making it essential for professionals aiming for precision bending. Understanding how to use this shortcut will significantly enhance your Genius Press Brake operation.
Press the Pump-Start Button Shortly
To start the hydraulic system of your Genius Press Brake, you need to briefly press the Pump-Start button. This action activates the hydraulic pump, ensuring smooth operation of the machine. Avoid holding the button too long, as it is designed for a short press to initiate the system. Once pressed, you should hear the pump engage, indicating that the machine is ready for operation. If the pump does not start, check the power supply and emergency stop status. Proper operation of the Pump-Start button is essential for maintaining the efficiency and longevity of your press brake.

Check The Main Motor Rotating Direction
Before operating the Genius Press Brake, it is essential to verify the main motor rotating direction to ensure smooth and safe machine performance. Incorrect motor rotation can lead to system malfunctions, reduced efficiency, or potential damage to the hydraulic system. To check the rotation, start the machine and observe the motor’s directional indicator or listen for unusual sounds. If the rotation is incorrect, switch off the power and adjust the power phase wiring. Always follow safety protocols and consult the user manual before making any modifications. Proper motor direction guarantees optimal performance and longer machine lifespan.
If It Rotates Clockwise, Then It Is Correct
When operating a Genius Press Brake with DA-66T or DA-69T, ensuring the correct rotation direction is crucial. “If it rotates clockwise, then it is correct” serves as a simple yet essential guideline. A clockwise rotation typically indicates proper motor alignment, ensuring the hydraulic system and backgauge function smoothly. Incorrect rotation may lead to system malfunctions, reduced bending accuracy, or even damage to the machine components. Before starting operations, always verify the motor rotation direction. If necessary, adjust the wiring to correct it. Following this rule guarantees optimal performance, precise bending results, and extended machine lifespan.

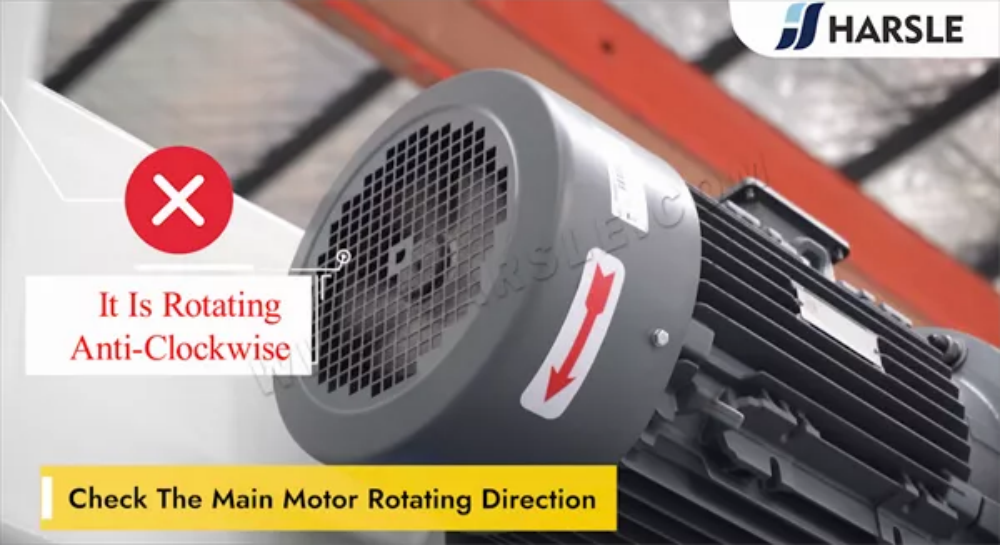
It Is Rotating Anti-Clockwise
When a machine component is rotating anti-clockwise, it moves in the opposite direction of a traditional clock’s hands. This type of rotation is commonly seen in press brakes, CNC machines, and industrial motors, where it ensures proper functionality based on mechanical design. Anti-clockwise rotation is often used to enhance torque efficiency, improve material handling, or match the operational requirements of specific tooling. Understanding the direction of rotation is crucial for safety, precision, and preventing mechanical failure. Always refer to the operation manual before adjusting or reversing rotation settings to avoid damage or misalignment in the system.
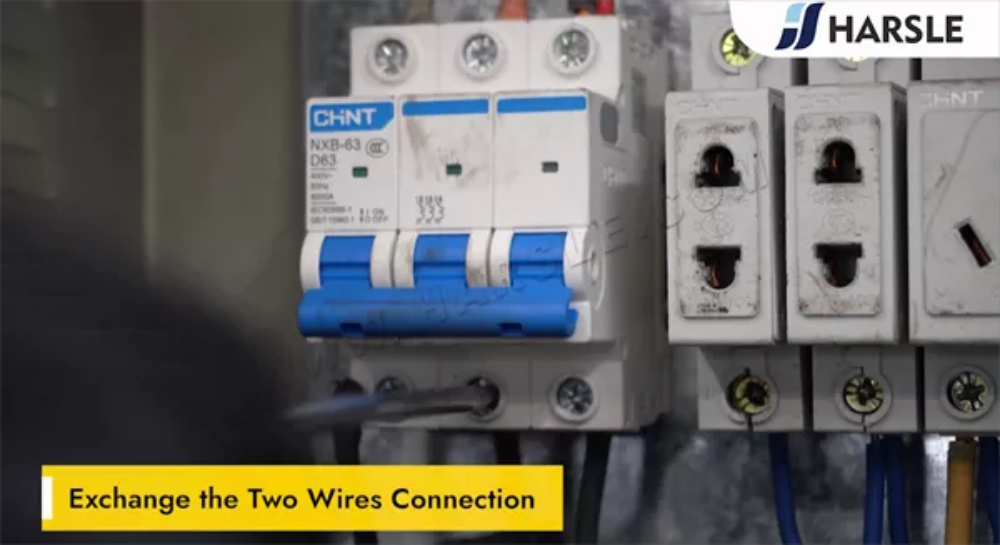
Exchange the Two Wires Connection
Exchanging the two wires connection is a simple yet crucial step in electrical adjustments, especially when dealing with CNC press brakes and other industrial machinery. This process is often required to correct motor rotation direction, resolve phase sequence issues, or ensure proper machine operation. Before starting, always turn off the power and wear insulated gloves for safety. Identify the two wires to be swapped, loosen their terminal screws, and carefully exchange their positions. Once reconnected, secure the terminals firmly and test the system. Proper wire exchange ensures stable performance and prevents machine faults, making it an essential skill for operators.
Part 2: Machine Start-up
Turn On the Machine Power Switch
Before operating the Genius Press Brake, ensure the machine is properly connected to a stable power source. Locate the main power switch on the side of the machine or control cabinet. Turn the switch to the “ON” position and wait for the system to initialize. The CNC controller (DA-66T or DA-69T) will boot up, displaying the startup screen. Check for any system warnings or error messages before proceeding. Ensure that the emergency stop button is released to enable full operation. Once powered on, the press brake is ready for parameter settings and bending operations.
Waiting For the System Loading
When powering on the Genius Press Brake equipped with the DA-66T or DA-69T controller, the system requires a few moments to initialize. During this time, critical components, including the CNC software, bending parameters, and safety features, are being loaded to ensure smooth operation. It is essential to wait patiently until the interface is fully ready before proceeding. Interrupting the process may cause system errors or incomplete settings. Once the loading is complete, you can begin configuring the bending parameters and starting your metal fabrication tasks efficiently. Please wait for the system to finish loading before operation.

Release the Emergency Stop Switch
The Emergency Stop Switch is a critical safety feature on the Genius Press Brake equipped with DA-66T and DA-69T controllers. If the machine stops unexpectedly due to an emergency activation, follow these steps to release it:
- Turn the Emergency Stop Button – Rotate the button clockwise until it pops out.
- Check for Error Messages – Inspect the controller screen for system alerts.
- Reset the Machine – Press the reset button or follow the control panel instructions.
- Restart Operation – Ensure all safety measures are in place before resuming work.

Turn On the light
Turning on the light is more than just flipping a switch—it’s about bringing clarity, warmth, and direction into a space. Whether it’s the glow of a bedside lamp, the brilliance of a streetlight guiding your way, or the radiance of the morning sun, light transforms our surroundings and our mood. It dispels darkness, reveals hidden details, and creates a sense of security. In life, “turning on the light” can also symbolize gaining knowledge, finding inspiration, or embracing new opportunities. So, whether literally or metaphorically, never hesitate to turn on the light and brighten your world.

Pull Down the Soft Buttons
The “Pull Down the Soft Buttons” function on the DA-66T and DA-69T controllers allows operators to access additional command options conveniently. Soft buttons are virtual buttons displayed on the touchscreen interface, dynamically changing based on the selected function. By pulling them down, users can reveal hidden features, shortcuts, or advanced settings without navigating away from the main interface. This feature improves workflow efficiency, enabling quick parameter adjustments and reducing operation time. Mastering soft button functions is essential for achieving precise bending results and optimizing machine performance. Regular use helps streamline programming and enhances user experience with the Genius Press Brake.
Press the Pump-Start Button
The Pump-Start Button is a crucial control in the Genius Press Brake (DA-66T & DA-69T), initiating the hydraulic system to power the machine. Before pressing it, ensure that the machine is properly connected to a stable power supply and that all safety checks have been completed. Once confirmed, press the Pump-Start Button firmly, allowing the hydraulic system to engage. You should hear the pump activate, signaling that the machine is ready for operation. If the pump does not start, check for emergency stop activation or system errors. Always follow the manufacturer’s guidelines for safe operation.

Press Start Button and Find Reference Points
Before starting any bending operation on the Genius Press Brake, it is essential to properly initialize the machine. Begin by pressing the start button, which activates the system and prepares it for operation. Once powered on, the next step is to find the reference points. These reference points help the machine calibrate its position, ensuring accurate bending angles and precise backgauge positioning. The DA-66T and DA-69T controllers automatically detect and adjust the reference points, enhancing efficiency and repeatability. Properly setting these points ensures smooth operation, reduces errors, and optimizes the overall bending performance of your CNC press brake.

Finding Reference Points Is Done
In Genius Press Brake operation with DA-66T and DA-69T controllers, the message “Finding Reference Points Is Done” indicates that the machine has successfully completed its reference point calibration. This process ensures that the backgauge, ram, and axes are correctly aligned, allowing for accurate bending results. Reference point calibration is essential before starting any bending tasks, as it enables the CNC system to maintain precision and repeatability. If this message does not appear, operators should check for sensor alignment, power supply issues, or mechanical obstructions. Regular calibration improves machine efficiency and prevents bending errors.

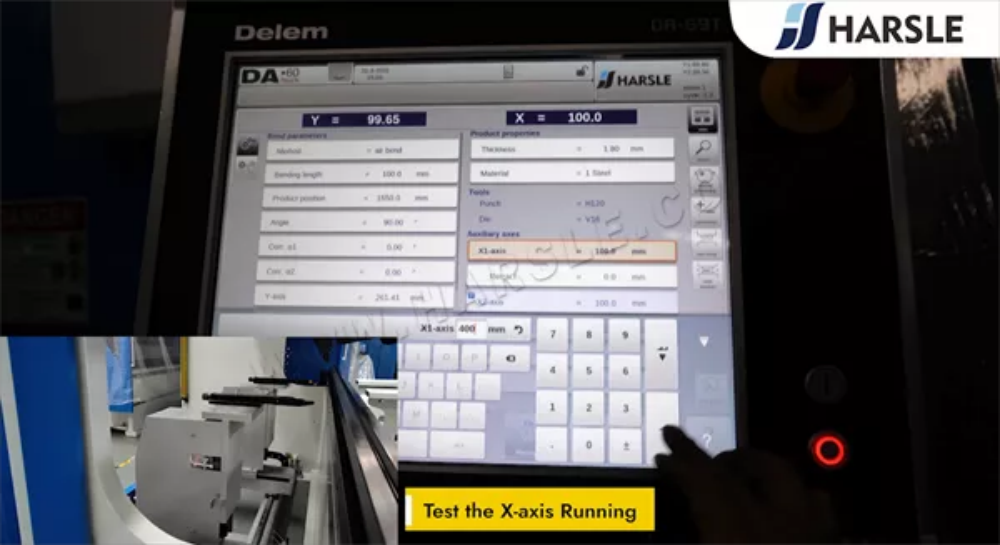
Test the X-axis Running
To ensure precise bending accuracy, it is essential to test the X-axis running on your Genius Press Brake. Begin by accessing the DA-66T or DA-69T controller and navigating to the backgauge settings. Set a reference point and command the X-axis to move forward and backward, observing its motion for smoothness and precision. Check for any misalignment, unusual noises, or delays in response. If any inconsistencies occur, calibrate the axis through the controller settings. Regular testing helps maintain optimal machine performance and ensures accurate positioning for high-quality bending results.
Test The Crowning System Running
Testing the crowning system on a press brake is essential to ensure consistent bending accuracy across the entire workpiece. Start by selecting a standard sheet metal and setting up the machine with an appropriate bending force and V-die opening. Activate the crowning system and run a test bend, checking for any deformation or inconsistencies. Use a straight edge or caliper to measure deflection along the bend. If needed, adjust the crowning settings to achieve uniform pressure distribution. Regular testing helps prevent bending defects, improves part quality, and extends the lifespan of your machine’s components.

Check The Tooling Parameters
Proper tooling parameter settings are crucial for achieving accurate and consistent bends on a Genius Press Brake. Before starting any operation, carefully check the punch, die, and material thickness settings in the DA-66T or DA-69T controller. Ensure that the V-opening, punch radius, and bending allowance are correctly configured to match the bending requirements. Incorrect parameters can lead to inaccurate angles, excessive wear on tools, or material defects. Regularly inspect tooling wear and recalibrate settings as needed. By maintaining optimal tooling parameters, you can improve bending precision, extend tool life, and enhance overall efficiency in your press brake operations.

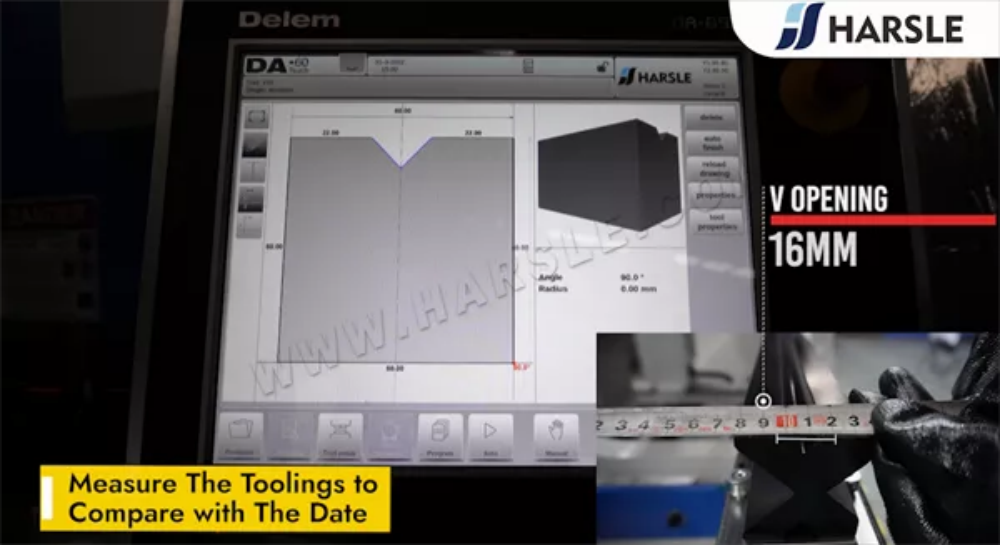
Measure The Tooling to Compare with The Date
Accurately measuring press brake tooling is essential to ensure compatibility with machine settings and bending precision. Use calipers or micrometers to measure the punch and die dimensions, including height, width, and angle. Compare these measurements with the original data provided by the manufacturer to verify accuracy. Even slight deviations can impact bending results, causing misalignment or material deformation. Regular measurement checks help maintain consistency and extend tool life. If discrepancies are found, recalibrate the tooling or consult the supplier for adjustments. Proper measurement ensures precision, reduces errors, and optimizes press brake performance.

Part 3 : Bending Programming
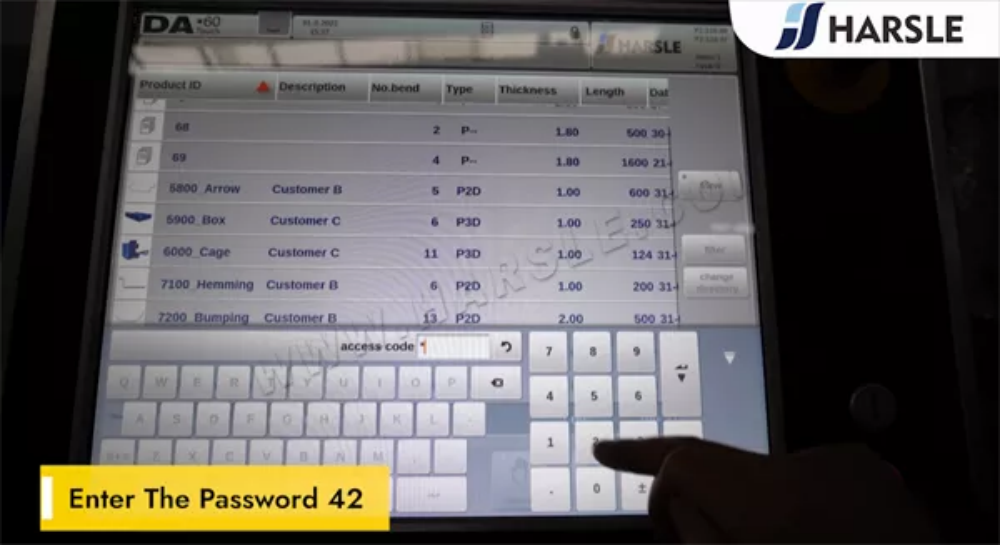
Enter The Password 42
A dimly lit screen flickered in the darkness, prompting: “Enter the Password.” Hands hesitated over the keyboard before typing “42”—a seemingly ordinary number, yet one that held infinite mystery. The system whirred, granting access with a soft beep. Suddenly, a cascade of encrypted files and hidden messages flooded the display. What did this password unlock? A forgotten truth, a secret experiment, or the gateway to an unknown dimension? The number 42, long hailed as the answer to life’s greatest question, had just revealed something far more profound. But was it knowledge—or a challenge waiting to be unraveled?
Enter The Program Name
When operating the Genius Press Brake with DA-66T or DA-69T, the first step is to enter the program name. This name helps identify the bending sequence and parameters for future reference. To do this, navigate to the programming interface, select “New Program”, and enter a unique name that describes the job. Using clear and structured names, such as material type or project ID, ensures easy retrieval. After confirming the entry, proceed with setting up the bending steps. Organizing programs systematically improves workflow efficiency and minimizes errors in CNC press brake operations.

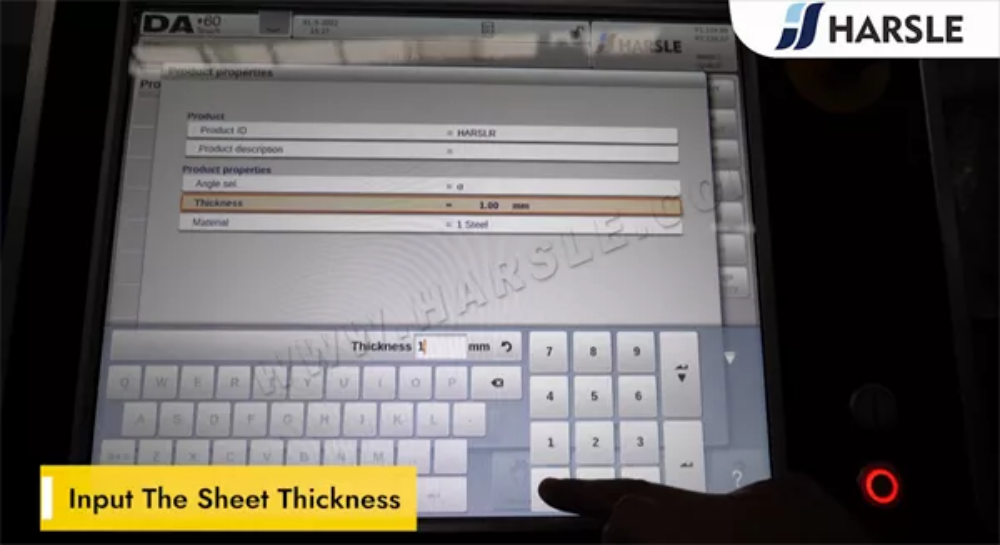
Input The Sheet Thickness
When operating the Genius Press Brake with the DA-66T or DA-69T controller, accurately inputting the sheet thickness is crucial for achieving precise bending results. To do this, navigate to the material settings in the CNC controller and enter the exact thickness of the sheet metal. Correct input ensures proper bending force calculation, prevents overloading, and maintains high bending accuracy. Always verify the thickness using a caliper before entry. Incorrect thickness settings can lead to inaccurate angles and potential machine strain. This step is essential for ensuring consistent, high-quality bends in your fabrication process.
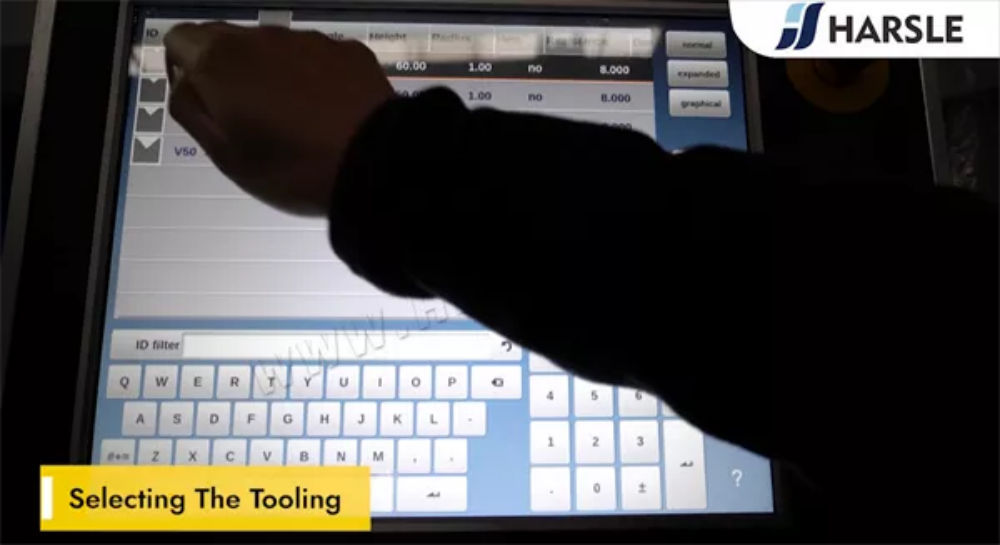
Selecting The Tooling
Choosing the correct press brake tooling is essential for achieving precise and consistent bends. The Genius Press Brake, equipped with DA-66T and DA-69T controllers, requires high-quality punches and dies that match the material type, thickness, and bending angle. Factors such as tool hardness, V-die opening, and punch radius significantly impact bending accuracy. Additionally, selecting quick-change tooling can enhance efficiency in production. For complex bends, segmented tooling allows for greater flexibility. Always ensure compatibility with CNC programming parameters to optimize performance. Investing in the right tooling not only improves bending precision but also extends machine lifespan.
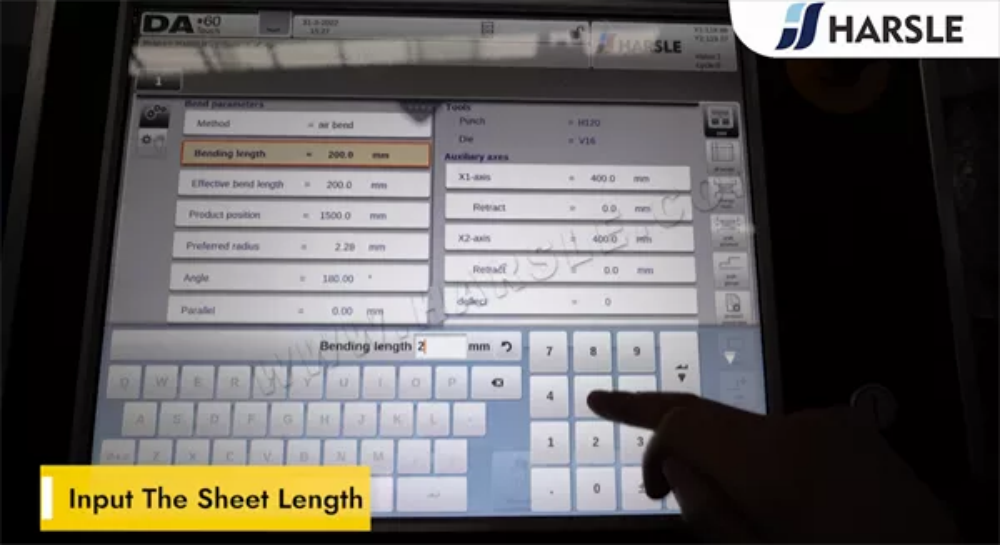
Input The Sheet Length
Entering the correct sheet length is crucial for accurate bending operations on the Genius Press Brake equipped with DA-66T or DA-69T controllers. To input the sheet length, navigate to the programming interface, locate the material settings, and enter the exact sheet length based on your workpiece specifications. This step ensures precise backgauge positioning and prevents misalignment during bending. Always double-check the entered value to match the actual sheet dimensions. Proper input of the sheet length enhances bending accuracy, repeatability, and efficiency, minimizing material waste and ensuring high-quality bends in CNC press brake operations.
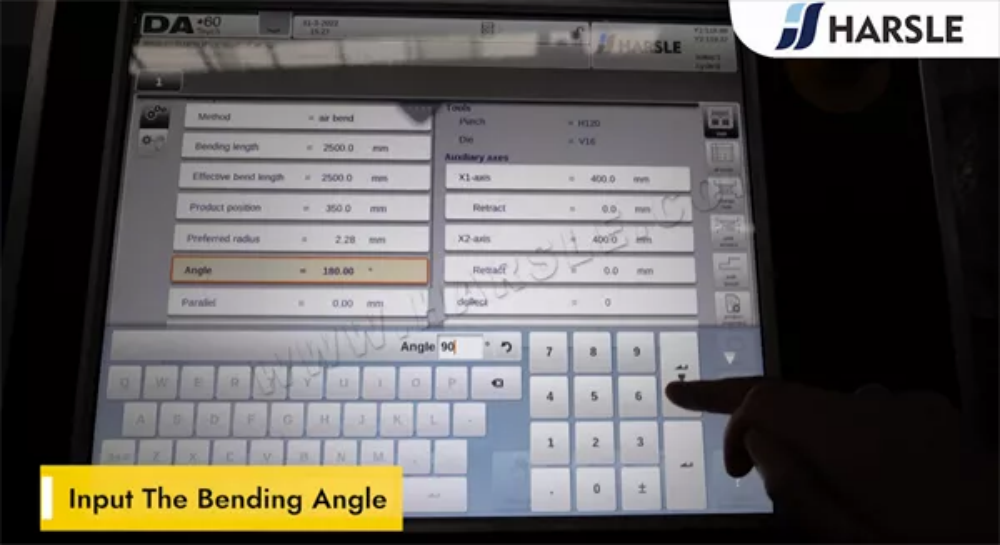
Input The Bending Angle
Accurate bending angle input is crucial for achieving precise sheet metal bends with the Genius Press Brake. Using the DA-66T and DA-69T CNC controllers, operators can easily set the desired angle through the user-friendly interface. The system automatically calculates the required punch depth based on material thickness and bending parameters, ensuring consistency in every bend. Fine adjustments can be made to compensate for springback, ensuring high precision. Mastering this function enhances efficiency, reduces material waste, and improves overall bending quality. Proper angle settings lead to a seamless production process with fewer errors and higher productivity.
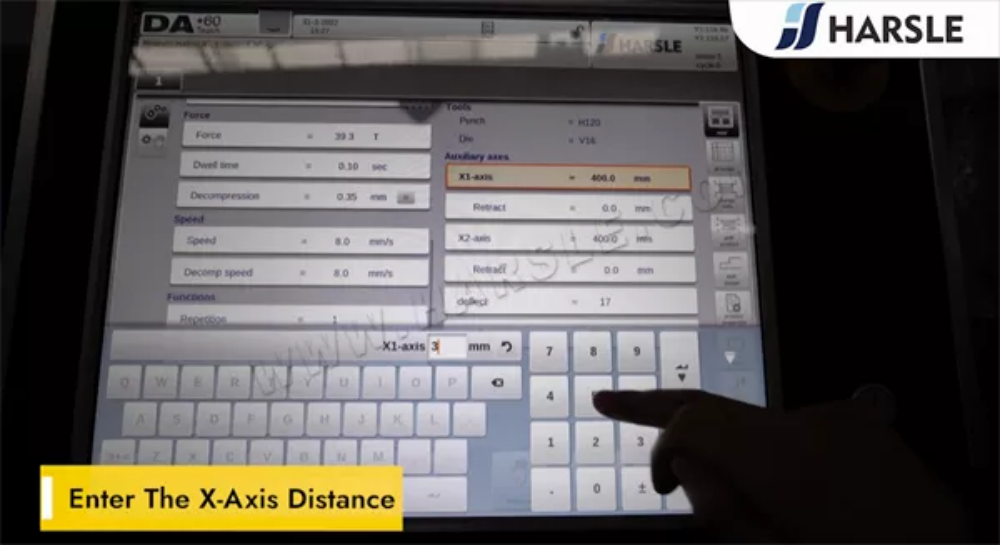
Enter The X-Axis Distance
The X-axis distance on a Genius Press Brake refers to the position of the backgauge, which determines where the metal sheet is placed for bending. Accurately setting this distance is crucial for achieving precise bend angles and consistent results.
To enter the X-axis distance on the DA-66T or DA-69T controller, navigate to the backgauge settings, input the required distance based on your bending requirements, and confirm the value. The system will automatically adjust the backgauge position. Proper calibration ensures repeatable accuracy, reduces errors, and enhances productivity. Always double-check the positioning before starting the bending process.
Add Another Bending Step
Adding another bending step in the Genius Press Brake with DA-66T or DA-69T controller allows for more complex bending sequences and precise metal forming. To do this, access the CNC controller interface and navigate to the bending program. Insert a new bending step by adjusting the angle, back gauge position, and pressure settings as required. Ensure each step follows the correct sequence to avoid errors. Double-check the simulation before execution to confirm accuracy. This feature enhances productivity and flexibility, making it easier to handle intricate sheet metal bending tasks efficiently.

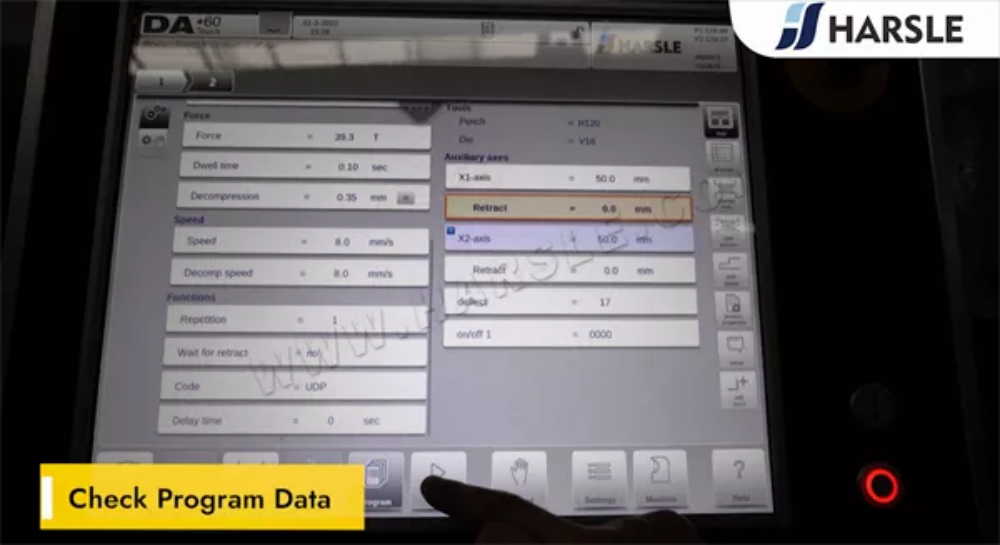
Check Program Data
Checking program data on the Genius Press Brake with DA-66T or DA-69T ensures accurate bending operations and minimizes errors. Before running a program, operators should verify key parameters, including bend angles, material thickness, tool selection, and step sequence. Use the controller interface to review and adjust data if necessary. Ensure the correct backgauge positioning and crowning settings to achieve precise results. Regularly checking program data enhances efficiency, reduces rework, and improves overall machine performance. Mastering this process ensures consistent, high-quality bends while maximizing the press brake’s capabilities.
Ready To Start
Ready to start your journey with the Genius Press Brake? Whether you’re a beginner or an experienced operator, mastering the DA-66T and DA-69T controllers is essential for achieving precise and efficient bending results. These advanced CNC systems offer intuitive programming, high accuracy, and seamless automation, helping you streamline your production process. In this guide, we’ll walk you through the key steps to optimize your press brake operation, from setup to advanced functions. Get ready to unlock the full potential of your machine and enhance your metal bending efficiency like never before! Let’s dive in.

Part 4: Bending Products
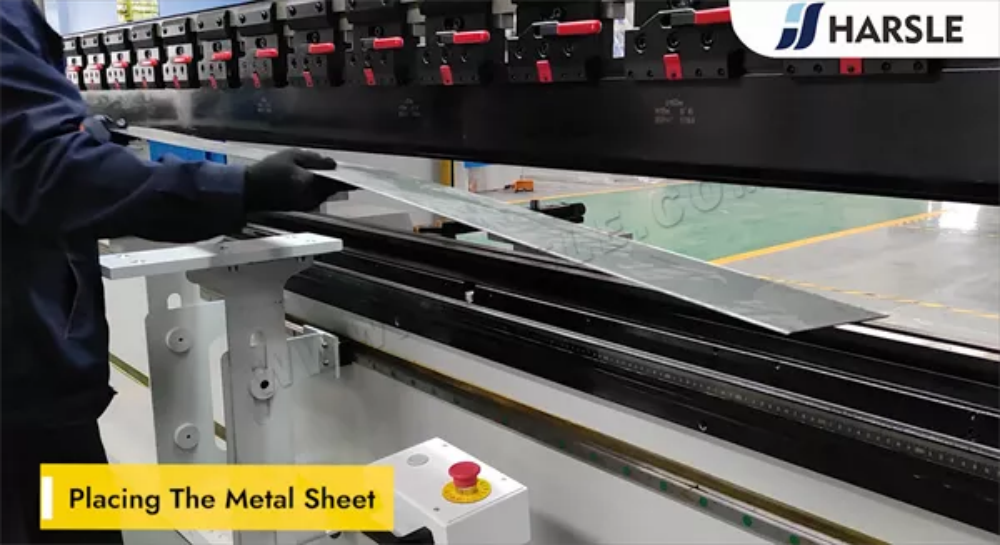
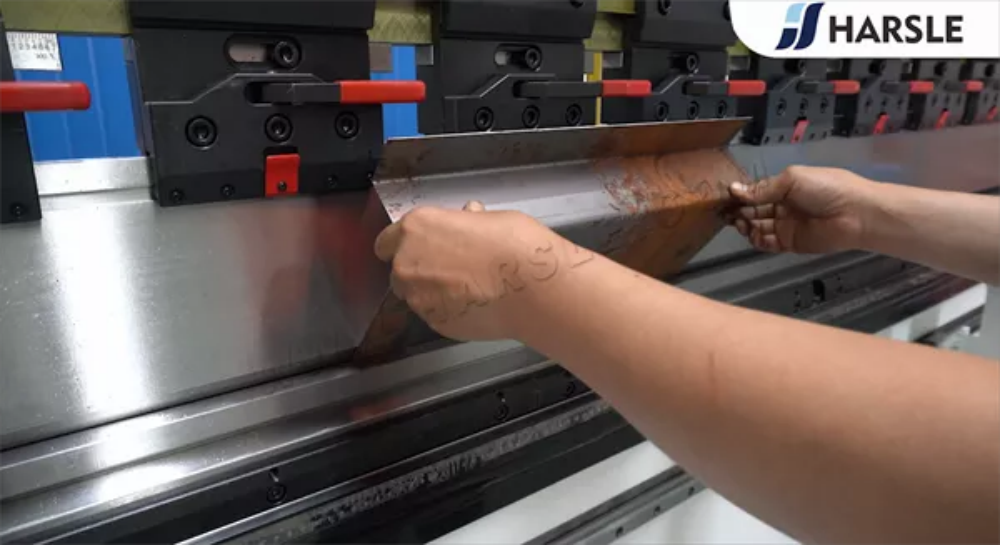
Placing The Metal Sheet
Placing the metal sheet correctly on the Genius Press Brake is essential for achieving precise and consistent bends. Start by ensuring the worktable is clean and free from debris to prevent misalignment. Position the sheet against the backgauge, aligning it with the required bending dimensions. Use automatic backgauge settings in the DA-66T or DA-69T controller to adjust the stop position accurately. For large or heavy sheets, consider using sheet followers or additional support to maintain stability. Proper placement not only enhances bending accuracy but also ensures operator safety and prolongs the tool’s lifespan.
Sheet Will Touch The Stop Fingers
When operating a Genius Press Brake, ensuring the sheet touches the stop fingers is crucial for accurate bending. The backgauge stop fingers serve as a reference point, positioning the metal sheet correctly before bending begins. If the sheet does not make full contact, it may lead to inaccurate bend angles or inconsistent results. Operators should adjust the backgauge position according to the bending program and verify alignment before pressing the pedal. Proper contact with the stop fingers ensures precise repeatability, reduced errors, and improved efficiency in CNC bending operations. Regular maintenance of the backgauge system is also essential for long-term accuracy.

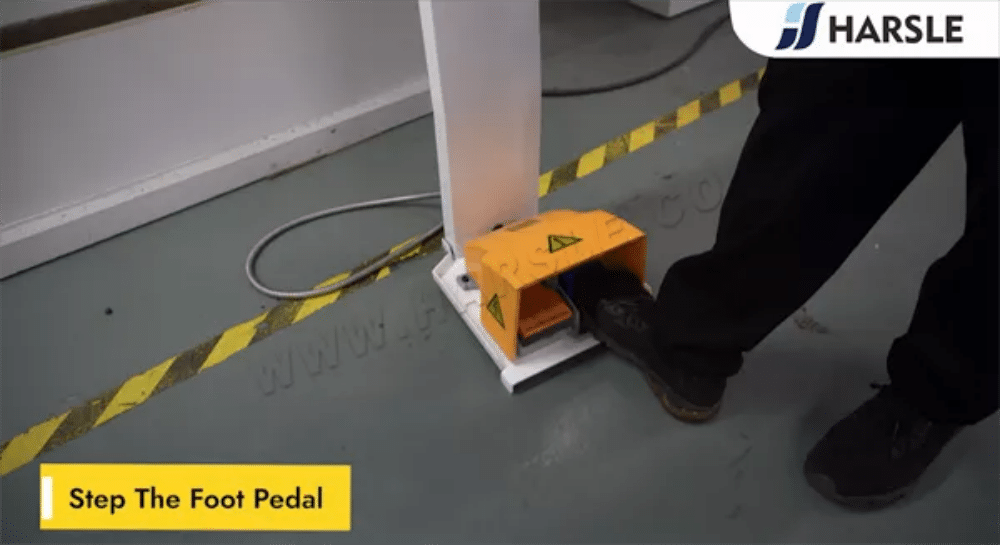
Step The Pedal
The foot pedal is a crucial control mechanism in Genius Press Brake operation, allowing operators to execute bending tasks efficiently. By pressing the pedal, users can activate, hold, or release the bending process with precision. The DA-66T and DA-69T controllers synchronize with the foot pedal to ensure smooth operation, reducing manual effort while enhancing productivity. Operators should maintain a steady foot movement to prevent sudden stops or misalignment during bending. Regularly check the pedal for proper response and safety compliance. Mastering foot pedal usage ensures seamless control, improving bending accuracy and efficiency in sheet metal fabrication.
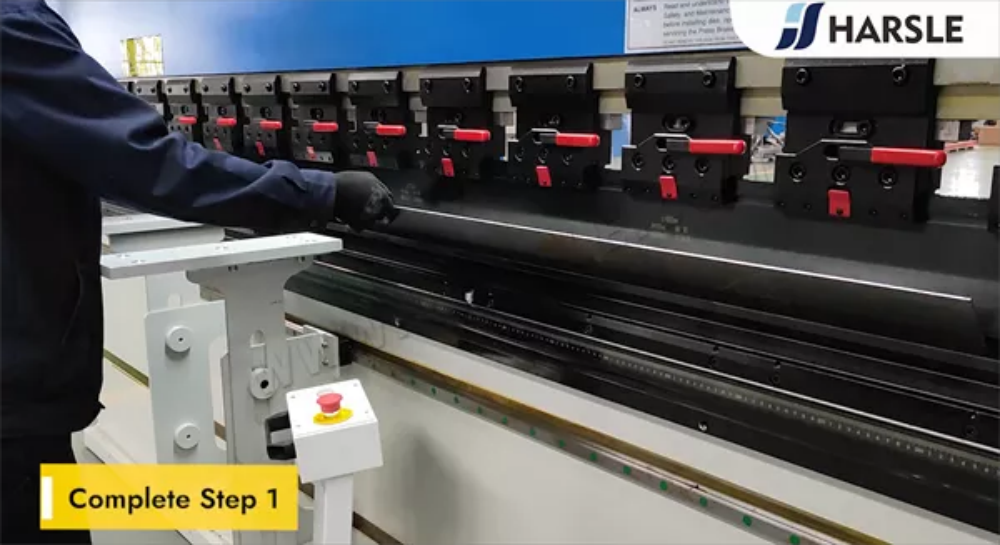
Complete Step 1
Before operating the Genius Press Brake, it’s crucial to familiarize yourself with the DA-66T and DA-69T CNC controllers. These advanced Delem systems provide intuitive touch-screen interfaces, real-time bending simulations, and precise control over bending parameters. Start by exploring the main menu, where you can access machine settings, material selection, and tooling configuration. Learn how to navigate between programming modes and adjust axes to ensure accurate and efficient bending. Understanding these controllers will maximize productivity, reduce setup time, and enhance bending accuracy, allowing you to take full advantage of the machine’s capabilities.
Press The Pedal
Pressing the pedal is a crucial step in operating the Genius Press Brake equipped with DA-66T or DA-69T controllers. The foot pedal serves as the primary control for executing the bending process, allowing operators to precisely manage the machine’s movement. With a responsive and ergonomic design, it ensures smooth operation, enhancing both efficiency and safety. Light pressure activates the bending cycle, while releasing the pedal stops movement instantly, preventing errors. Operators must ensure their feet are positioned correctly to maintain stability and avoid unintended activation. Mastering pedal control leads to improved workflow and higher precision in metal bending tasks.

Complete Step 2
Once the Genius Press Brake is powered on, the next crucial step is setting up the DA-66T or DA-69T CNC controller. Start by selecting the appropriate bending program or creating a new one. Input key parameters such as material type, thickness, bending angle, and punch/die selection. Use the touchscreen interface to adjust backgauge positioning and crowning settings for precision. Double-check all values to ensure accuracy before proceeding. Proper setup ensures smooth, consistent bends and minimizes errors. Mastering this step improves efficiency and extends the lifespan of your press brake tools.

Part 5 : Measurement And Calibration
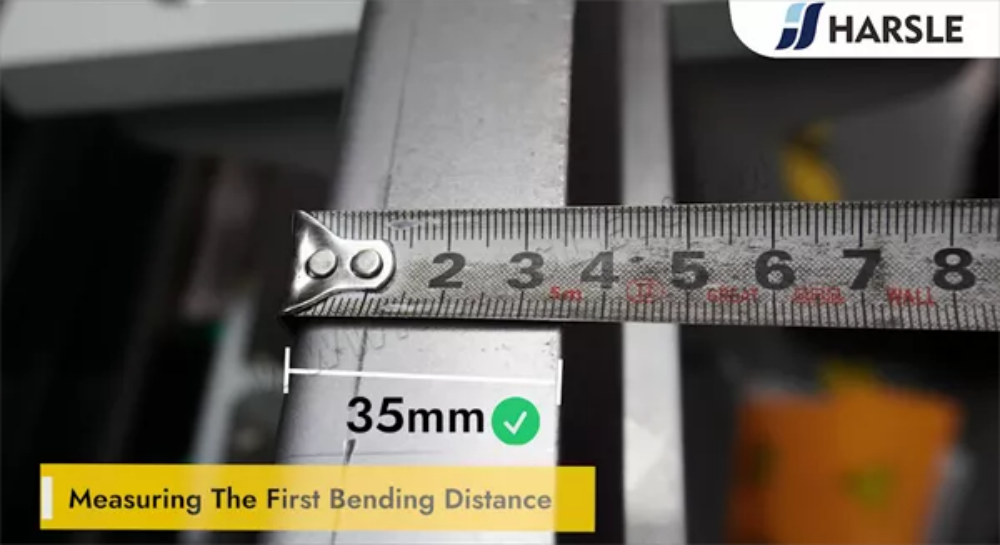
Measuring The First Bending Distance
The first bending distance is a critical factor in achieving precise sheet metal bending. It refers to the initial gap between the bending tool and the workpiece, which directly affects the accuracy of the bend angle and final dimensions. To measure it correctly, operators must consider factors like material thickness, bend allowance, and tooling type. Using a CNC press brake with DA-66T or DA-69T, you can input precise measurements to ensure consistency. Proper calibration and test bending help eliminate errors, resulting in flawless bends and reduced material waste. Mastering this step ensures efficiency and high-quality production.
Measuring The Second Bending Distance
Measuring the second bending distance is crucial for achieving accurate and consistent results in press brake operations. This step ensures that the material aligns correctly for the next bend, preventing errors and maintaining precision. To measure it effectively, operators should consider factors such as material thickness, bend angle, and springback effect. Using a backgauge system and verifying the programmed values on the DA-66T or DA-69T controller can help maintain accuracy. Additionally, performing a test bend before full-scale production can prevent miscalculations. Proper measurement techniques reduce rework, enhance productivity, and ensure high-quality metal bending outcomes.

Using The Angle Ruler
The angle ruler is an essential tool for ensuring accurate bending in Genius Press Brake operations. It helps operators measure and verify the bending angle of sheet metal, reducing errors and improving precision. When using the DA-66T or DA-69T controllers, the angle ruler allows real-time adjustments, ensuring each bend meets design specifications. To use it effectively, position the ruler at the bend, compare the measured angle with the programmed value, and make necessary corrections. Regular calibration of the angle ruler enhances accuracy. Mastering this tool ensures consistent, high-quality bends, optimizing efficiency in CNC press brake operations.
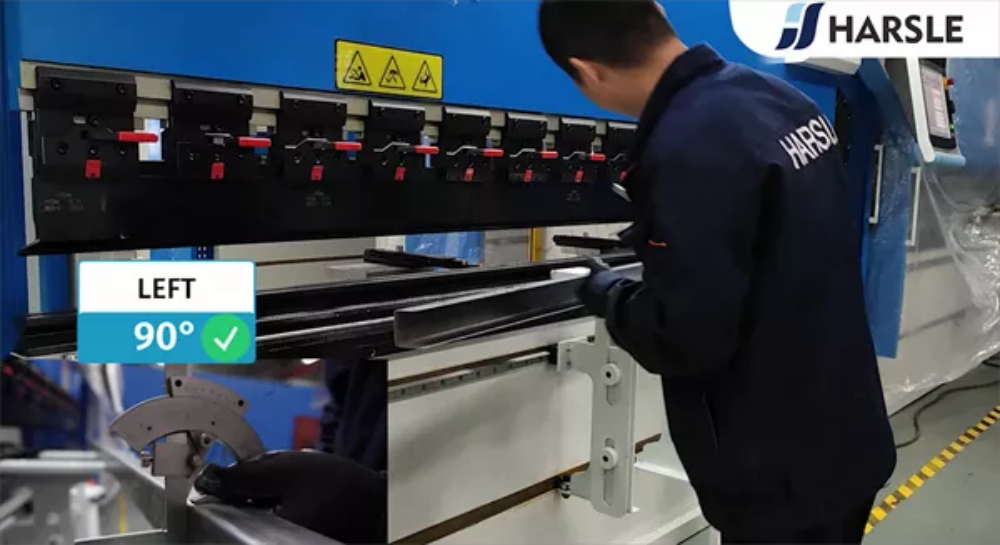
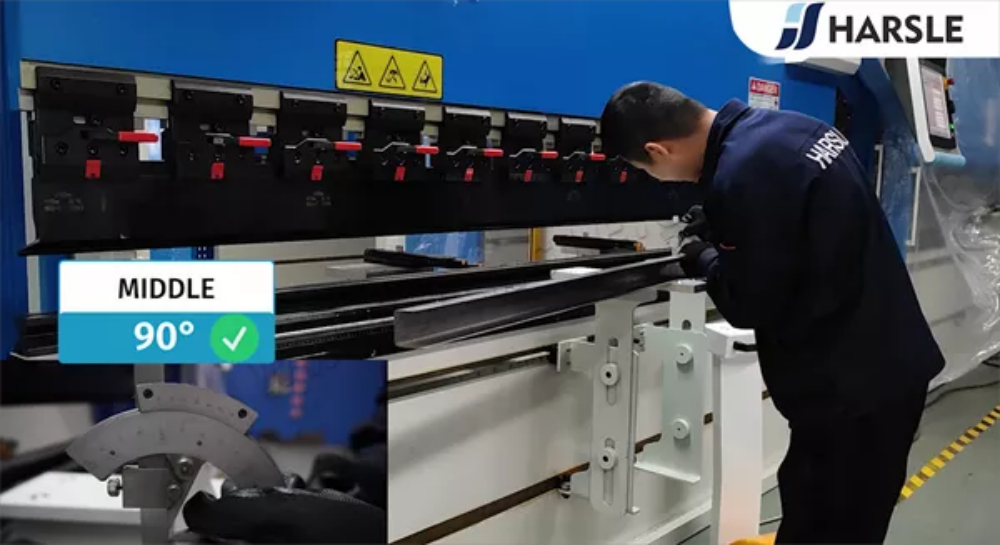
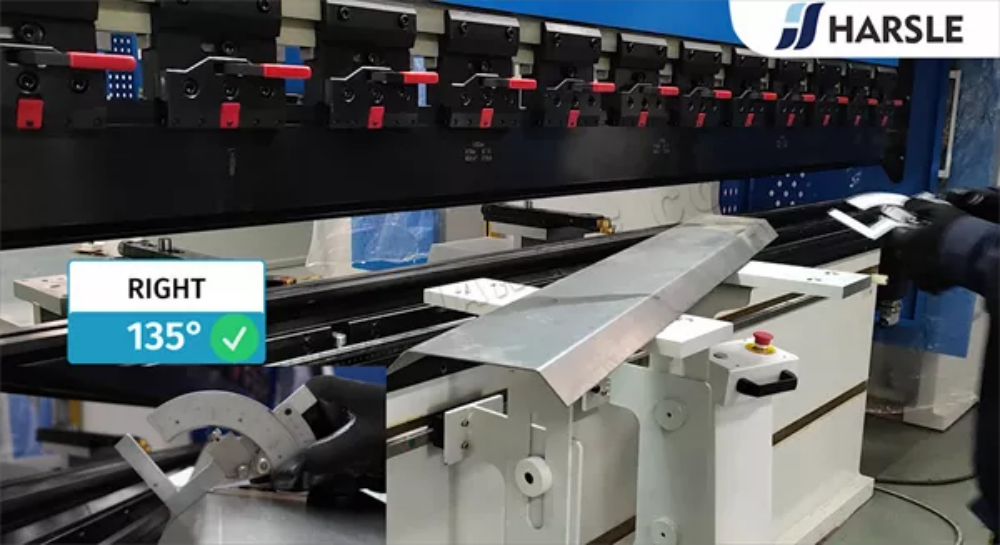
Measure The Bending Angles In Three Positions: Left, Middle And Right
To ensure precision in metal bending, it is crucial to measure the bending angles at three key positions: left, middle, and right. This method helps identify any inconsistencies caused by material properties, tooling wear, or machine calibration. Use an angle gauge or digital protractor to check each section after bending. If deviations occur, adjustments to crowning, backgauge alignment, or pressure settings may be necessary. Regularly measuring these three positions improves bending accuracy and ensures uniform results across the entire workpiece, reducing rework and improving efficiency in CNC press brake operations.

Error Found Was Found In Left Position
During the operation of the press brake, an error was detected in the left position, affecting the accuracy of the bending process. This issue could be caused by several factors, including sensor misalignment, hydraulic imbalance, or software calibration errors in the DA-66T or DA-69T controller. To resolve this, operators should first check the position sensors, inspect the hydraulic system for pressure inconsistencies, and ensure the CNC system is properly calibrated. Regular maintenance and timely troubleshooting can help prevent such issues, ensuring consistent bending precision and machine performance.
Measured At 89°
During the bending process, the angle was measured at 89°, slightly deviating from the intended 90°. This minor discrepancy could be due to material springback, incorrect punch and die selection, or insufficient pressure applied by the press brake. To correct this, operators should first check the bend allowance settings in the DA-66T or DA-69T controller, adjust the backgauge positioning, and perform a test bend with compensation. Ensuring proper tool selection and material consistency can help achieve precise bending angles and improve the overall accuracy of the press brake operation.


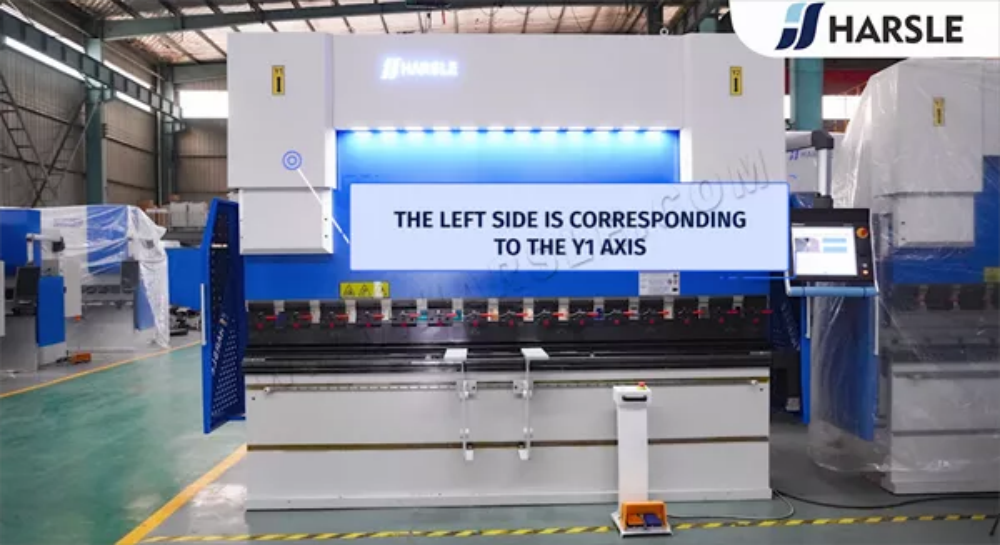
The Left Side Is Corresponds To The Y1 Axis
In a CNC press brake, the left side of the machine corresponds to the Y1 axis, while the right side is controlled by the Y2 axis. These independent hydraulic axes allow for precise control of the ram movement, ensuring accurate and consistent bending. If there is a misalignment or bending error on the left side, operators should check the Y1 axis calibration, hydraulic pressure balance, and encoder signals. Proper synchronization between Y1 and Y2 is essential for achieving uniform bending angles and minimizing deformation in metal fabrication processes. Regular maintenance ensures smooth and accurate operation.
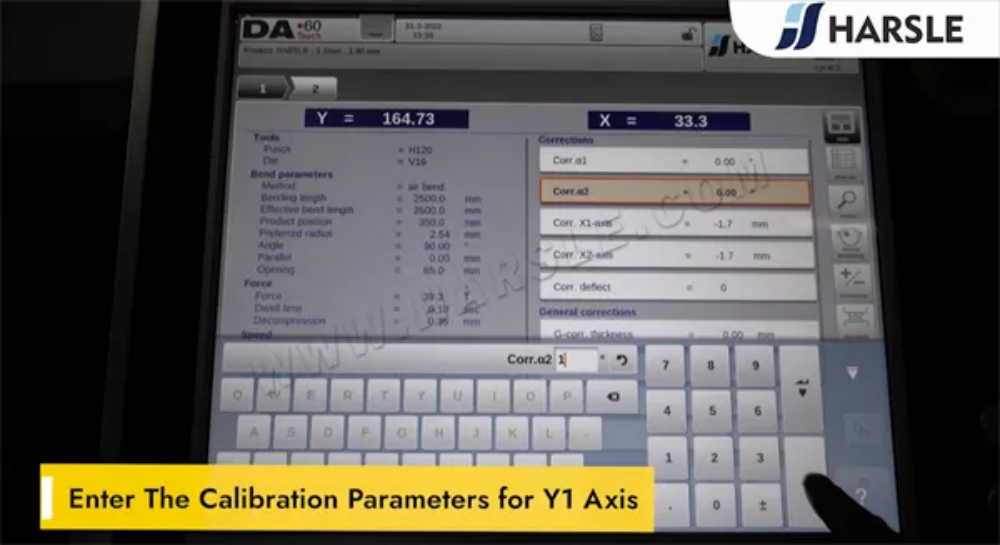
Enter The Calibration Parameters For Y1 Axis
To ensure precise bending accuracy, it is essential to enter the calibration parameters for the Y1 axis correctly. The Y1 axis controls the left-side movement of the ram, and any misalignment can lead to uneven bends. Calibration involves setting reference points, adjusting stroke limits, and verifying synchronization with the Y2 axis. Operators should access the DA-66T or DA-69T controller, navigate to the calibration menu, and input the required values based on the machine specifications. Regular calibration helps maintain consistent bending precision, reduces errors, and enhances the overall performance of the press brake.
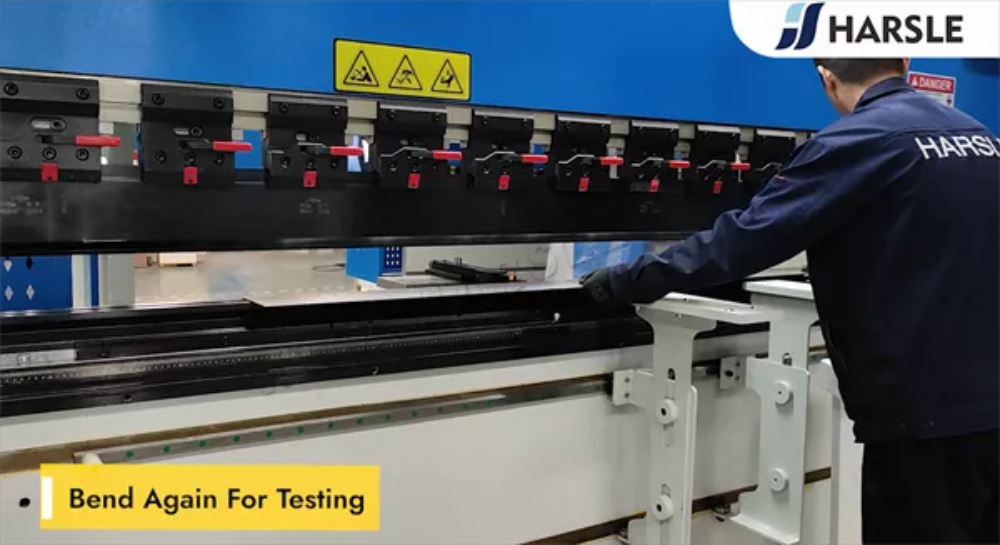
Bend Again For Testing
After making adjustments to the press brake settings, it is necessary to bend again for testing to verify accuracy. This step ensures that angle deviations, material springback, or calibration errors have been properly corrected. Operators should select a test piece of the same material and thickness, set the correct parameters on the DA-66T or DA-69T controller, and carefully observe the bending result. If any discrepancies remain, fine-tuning the backgauge, punch penetration, or compensation settings may be required. Performing multiple test bends helps achieve optimal precision and consistency in the metal bending process.
Measure To Check
After completing the bending process, it is crucial to measure to check whether the final angle meets the required specifications. Using precision measuring tools such as a protractor, angle gauge, or digital caliper, operators can determine if any deviations or inconsistencies exist. If the measured angle does not match the target, adjustments may be needed in bending force, punch penetration, or material positioning. Consistently measuring after each test bend ensures accuracy, reduces material waste, and optimizes production efficiency. Regular verification helps maintain high precision and quality in CNC press brake operations.
It Is Correct Now
After making the necessary adjustments and conducting test bends, the final measurement confirms that it is correct now. The achieved bending angle aligns with the required specifications, ensuring high precision and consistency in the metal forming process. This verification step is essential to confirm that calibration settings, tool selection, and material positioning were properly adjusted. Operators can now proceed with full-scale production, knowing that the machine is functioning optimally. Regular checks and fine-tuning help maintain accuracy, reduce errors, and improve overall efficiency in CNC press brake operations.

Part 6: Graphic Programming
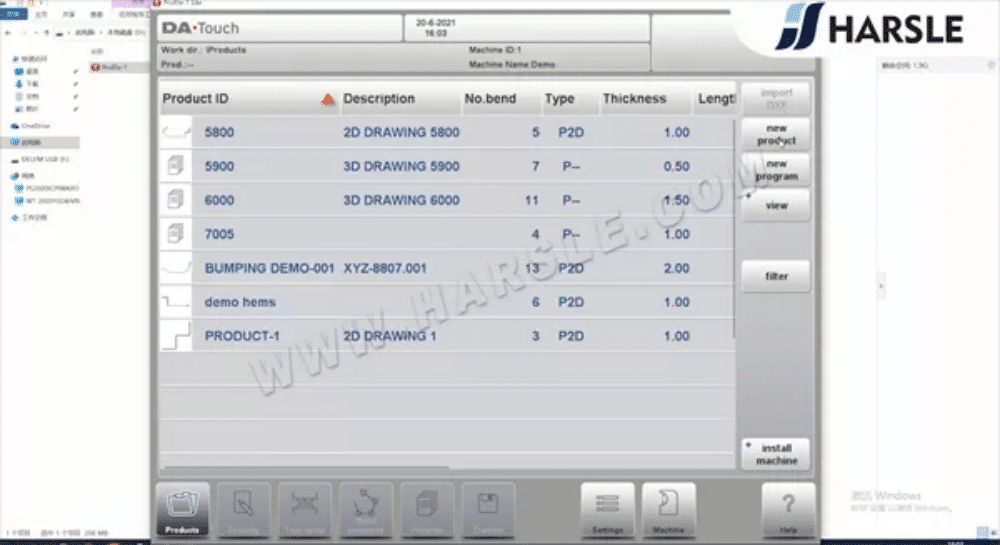
Add New Product
To expand the product lineup and improve efficiency, it is essential to add a new product to the system. In a CNC press brake, this involves updating the DA-66T or DA-69T controller with new bending parameters, material specifications, and tooling configurations. Operators should carefully input material type, thickness, bending angle, and die selection to ensure precise results. Once added, performing a test bend helps verify accuracy before full-scale production. Regularly updating the system with new products and optimized settings enhances workflow efficiency, reduces setup time, and ensures consistent bending performance in metal fabrication.

Enter product information
To ensure precise bending operations, operators must enter product information into the CNC press brake system. This process includes inputting key details such as material type, thickness, bending angle, punch and die selection, and bending sequence. On controllers like the DA-66T or DA-69T, accurate data entry ensures that the machine follows the correct parameters, minimizing errors and improving efficiency. Properly storing product information allows for quick recall of settings, reducing setup time for repeat orders. Verifying all inputs before operation helps maintain high precision, consistency, and quality in the metal bending process.

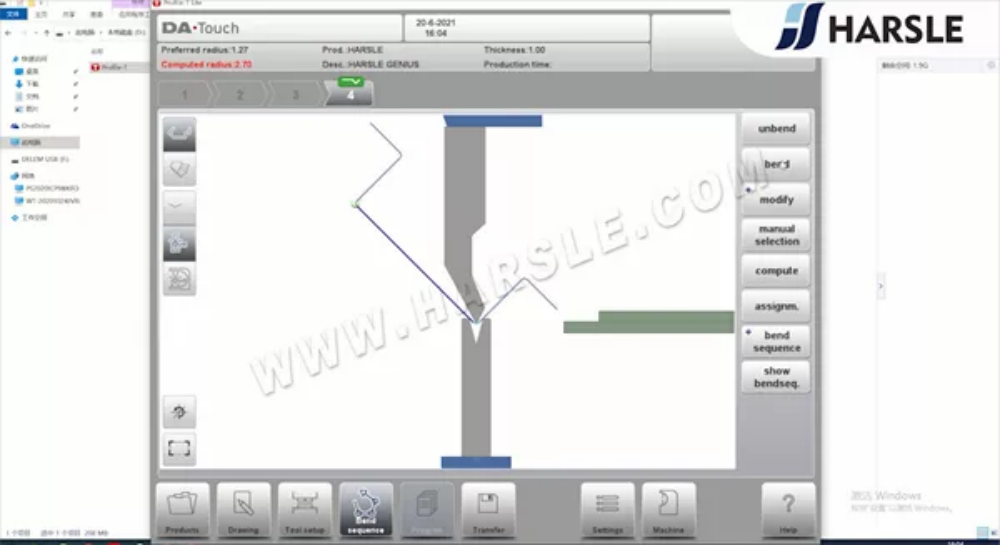
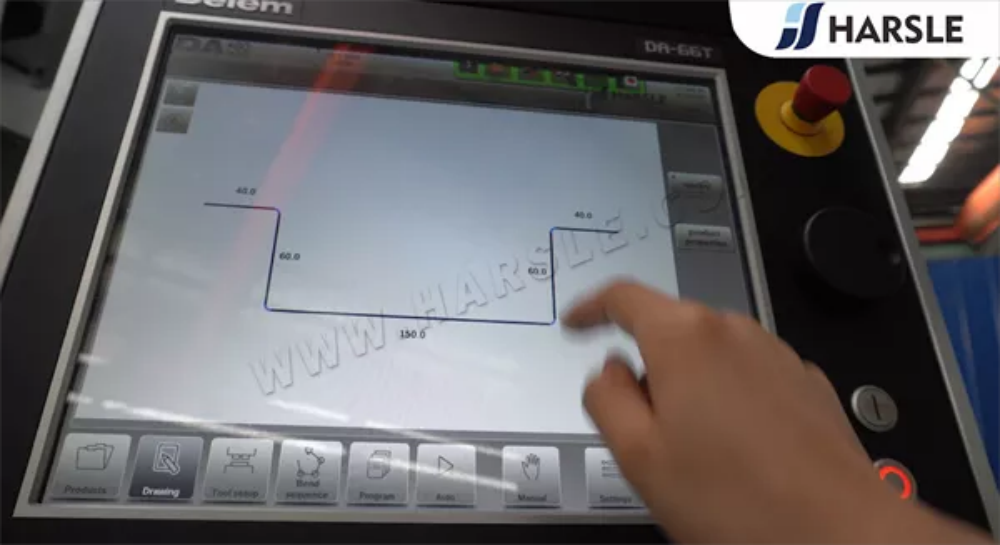
2D Graphic Programming
2D Graphic Programming is an essential feature in CNC press brakes that allows operators to visually design and simulate bending sequences before actual production. Using controllers like DA-66T or DA-69T, users can create a 2D representation of the metal sheet, define bending angles, select tooling, and preview the bending process. This intuitive interface helps in error detection, material positioning, and optimizing the bending order to prevent collisions. By programming in 2D, operators can achieve higher precision, reduce material waste, and improve efficiency in metal fabrication. This method simplifies setup and enhances production accuracy.

Choose Toolings
Choosing the right toolings is a crucial step in CNC press brake operations, as it directly impacts bending accuracy, efficiency, and material quality. Operators must select the appropriate punch and die based on material thickness, bending angle, and desired bend radius. Using the DA-66T or DA-69T controller, users can input tooling specifications to ensure compatibility with the programmed bending sequence. Factors such as tool hardness, V-die width, and punch shape must be considered to prevent material deformation and tool wear. Proper tooling selection enhances bending precision, reduces setup time, and extends machine lifespan in metal fabrication.

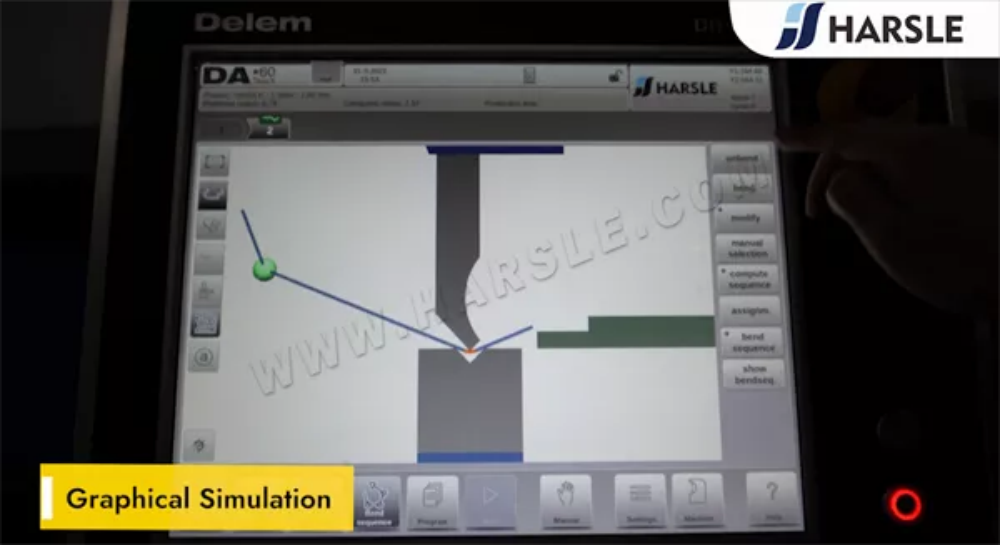
Graphical Simulation
Graphical simulation is a powerful feature in CNC press brake controllers like DA-66T and DA-69T, allowing operators to visualize the entire bending process before execution. This function provides a 2D or 3D representation of the bending sequence, ensuring that the programmed angles, tooling setup, and material positioning are correct. It helps identify potential errors, collisions, or misalignments before actual production, reducing material waste and improving efficiency. By simulating the bending operation, operators can optimize the bending sequence, adjust parameters in real-time, and achieve higher precision, ensuring consistent and high-quality results in metal fabrication.


Measure The Bending Angles In Three Positions: Left, Middle And Right
To ensure bending accuracy and consistency, operators must measure the bending angles in three positions: left, middle, and right. This step helps identify any deviations, misalignment, or uneven pressure distribution across the workpiece. Using an angle gauge or digital protractor, measurements should be taken at each position to confirm uniformity. If variations are detected, adjustments may be needed in crowning, tool selection, or CNC controller settings (DA-66T/DA-69T). Regularly checking bending angles in multiple positions ensures precision, reduces rework, and improves overall bending quality, leading to efficient and accurate metal fabrication results.

Measured At 135°
After completing the bending process, the angle was measured at 135°, confirming the precision of the press brake operation. Using a digital protractor or angle gauge, the measurement ensures that the bend meets the required specifications. If the angle deviates, adjustments in bending force, material positioning, or compensation settings may be necessary. The DA-66T or DA-69T controller allows operators to fine-tune the parameters to achieve the desired result. Regular angle measurement and verification are essential to maintain high accuracy, reduce errors, and improve efficiency in metal bending and fabrication processes.


Part 7: 3D Graphic Programming(Only for DA-69T)
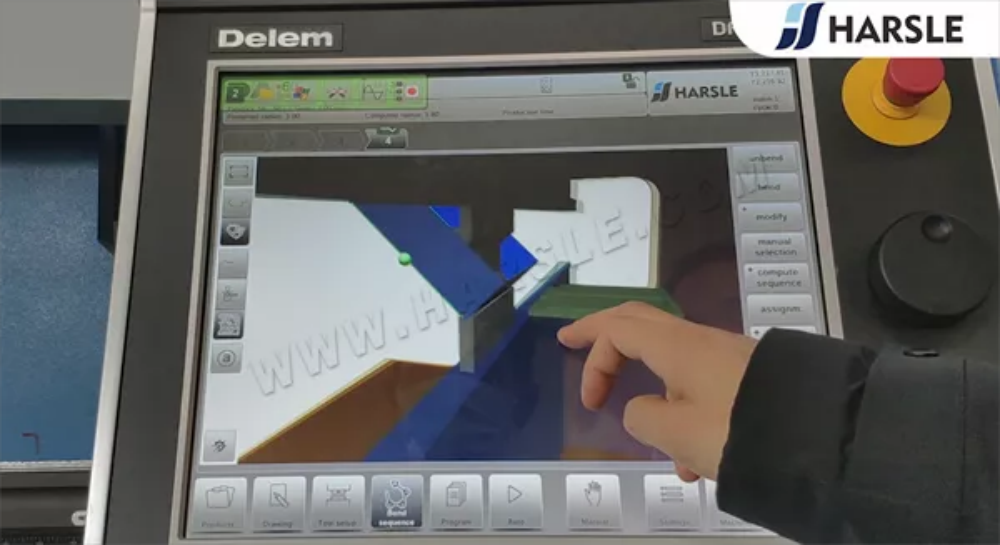
3D Graphic Programming
3D Graphic Programming is an advanced feature in CNC press brake controllers like DA-66T and DA-69T, allowing operators to visualize and simulate the entire bending process in a three-dimensional view. This technology enables users to define bending sequences, select tooling, and detect potential collisions before executing the program. By interacting with a realistic 3D model, operators can optimize bending angles, backgauge positions, and material flow, ensuring higher accuracy and efficiency. The ability to preview the bending process reduces errors, material waste, and setup time, making 3D graphic programming essential for precision metal fabrication.

Part 8: Offline Software
Offline Software
Offline software is a powerful tool that allows operators to program and simulate CNC press brake operations without interrupting machine production. With controllers like DA-66T and DA-69T, users can create bending programs, select tooling, and optimize bending sequences on a computer workstation before transferring the data to the press brake. This enhances workflow efficiency, reduces setup time, and minimizes production downtime. Additionally, offline programming helps detect collisions, bending errors, and material misalignment in advance, ensuring precise results. By using offline software, metal fabrication companies can improve productivity, accuracy, and machine utilization for high-performance bending operations.


Part 9: Switch Off
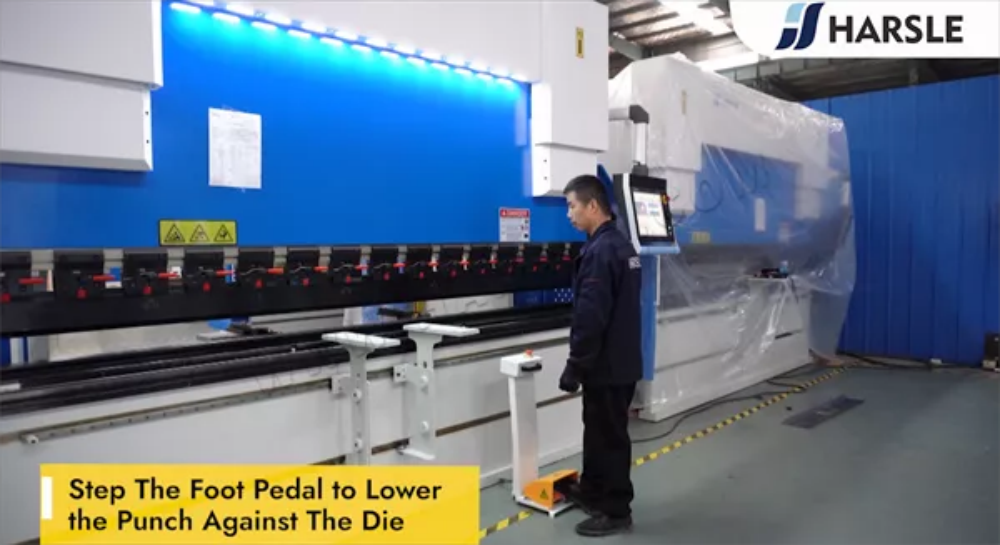
Step The Foot Pedal to Lower the Punch Against The Die
To initiate the bending process on a CNC press brake, the operator must step on the foot pedal to lower the punch against the die. This action activates the hydraulic or servo system, guiding the upper punch downward with controlled force. The DA-66T or DA-69T controller ensures precise depth and pressure based on programmed settings. It is crucial to maintain steady foot control to prevent sudden force application, which could lead to bending inconsistencies. Proper foot pedal operation helps achieve accurate bends, minimizes errors, and enhances operator safety during metal fabrication.
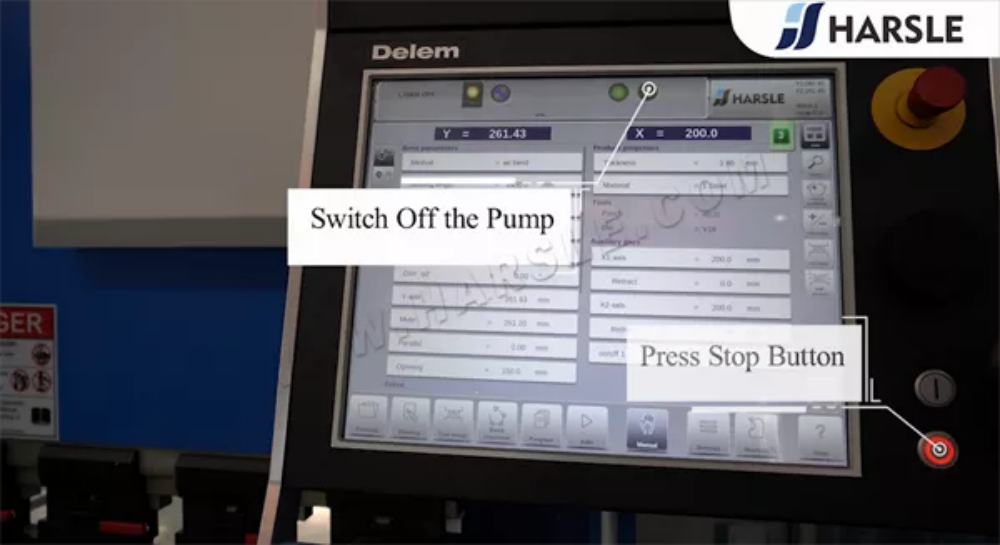
Press Stop Button
In CNC press brake operations, pressing the Stop button is a critical function that immediately halts the machine’s movement, ensuring operator safety and preventing potential damage. This button can be used in case of an emergency, misalignment, or incorrect bending sequence. On controllers like DA-66T or DA-69T, stopping the machine allows operators to reassess settings, make adjustments, or troubleshoot issues before resuming work. It is essential to familiarize yourself with the stop function to ensure quick reaction times when needed. Proper use of the Stop button enhances machine safety, accuracy, and overall efficiency in metal bending operations.
Switch Off the Pump
To properly shut down a CNC press brake, it is essential to switch off the hydraulic pump once operations are complete. The pump is responsible for generating hydraulic pressure, which powers the bending process. Turning it off helps prevent unnecessary wear, reduces energy consumption, and ensures machine longevity. Before switching off, ensure that the press brake is in a safe position, and no active commands are running on the DA-66T or DA-69T controller. Regularly shutting down the pump correctly helps maintain system efficiency, prolongs component lifespan, and ensures a safe working environment for operators.
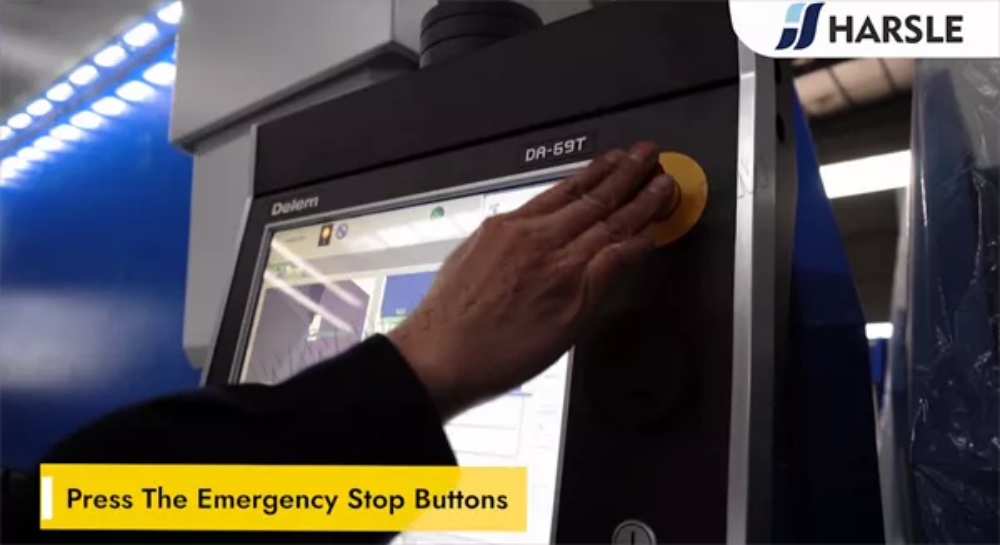
Press The Emergency Stop Buttons
The Emergency Stop (E-Stop) button is a crucial safety feature on a CNC press brake, designed to immediately halt all machine operations in case of an emergency. Pressing the E-Stop instantly cuts off power to the hydraulic system, preventing potential damage to the machine, tooling, or workpiece. Operators should use this button in situations like misalignment, unexpected movement, or safety hazards. On controllers such as DA-66T or DA-69T, restarting the machine after an E-Stop requires resetting the system. Knowing when and how to use the Emergency Stop button ensures operator safety and machine protection during metal fabrication.

Turn Off the Power Switch
After completing the bending process, it is essential to turn off the power switch to safely shut down the CNC press brake. This step helps prevent electrical hazards, conserve energy, and protect machine components from unnecessary wear. Before switching off, ensure that all bending operations are completed, the hydraulic pump is turned off, and the controller (DA-66T or DA-69T) is properly exited. Operators should follow standard shutdown procedures to avoid system errors when restarting. Regularly turning off the power switch after use helps maintain machine longevity, enhances safety, and ensures an efficient working environment.

Above video is the detailed operation tutorial of our Genius Press Brake DA-66T and DA-69T. There could be more problems during actual operations, kindly leave messages on our background to communicate with us and. HARSLE will serve you with full commitment.


