


If you’re looking to master the ESTUN E300 Basic Operation, you’re in the right place. As someone who knows the importance of efficiency and precision in machinery, I understand how crucial it is to grasp the essential functions of the ESTUN E300. In this article, I’ll guide you through the fundamental operations of the ESTUN E300, offering insights that will help you optimize its use for your applications. Whether you’re just starting out or aiming to refine your skills, this guide provides the crucial information you need to make the most of your ESTUN E300, ensuring smooth and efficient operations.
Getting Started with ESTUN E300
Step 1: Starting the ESTUN E300
Begin the ESTUN E300 basic operation by ensuring all safety protocols are followed. To start the machine, first ensure that the power source is stable and connected. Press the main power button, and wait for the machine to initialize. Confirm that the control display is active and showing the main menu.
Press START key to startup the machine when you complete the program on Single-Step page or Multi-Step page, the servo-axis can start to positioning. When the machine is ready, it can be produced.
However, it is unavailable to press START key on other pages
Start state: When the device is running, its indicator lamp can be lighting. In addition, you can see the status on the top of page is RUN.
Step 2: Stopping the ESTUN E300
The stopping process for the ESTUN E300 is straightforward. To safely shut down the machine, navigate to the control panel and press the stop button. Ensure that the machine completes its cycle if it is mid-operation, and wait for the confirmation on the control panel before turning off the power.
There are 3 cases for stopping the device.
- Stop by a fault: If any fault occurred during the operation, the machine can stop automatically.
- Normally Stop: it also includes the following case:
- Manual stop: press STOP key, the running machine can stop.
- Count is finished: for the Count Mode is Cnt Down, when the Stock is 0, the running machine can stop automatically.
- Emergency Stop: press down EMERGENCY STOP button, the power supply of the system can be cut off.
Stop state: When the device is stopped, its indicator lamp can be lighting. In addition, you can see the status on the top of page is Idle or Alarm.
Managing Alarms and Resets
Alarm Information
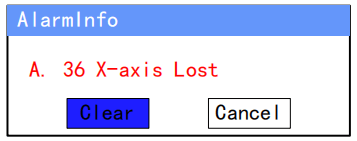
During the ESTUN E300 basic operation, an alarm may occur. When an alarm is triggered, identify the alarm code displayed on the panel. Refer to the operation manual for details on the specific alarm code. Address the underlying issue—this might involve clearing an obstruction or correcting a parameter setting.
As shown in the figure below, which indicates a fault had occurred during the operation. It is necessary to solve it for recovering the running machine.
How to Reset
Follow the section Appendix D Alarm List, solving the fault according to the fault message, and then move the cursor on Clear, and press ENTER key, so that the system can try to reset.
However, the fault message may display again if the fault hasn’t been solved properly.
Move the cursor on Cancel and press ENTER key, the AlarmInfo dialog-box can be hidden temporarily. To display it again, press CLEAR key when the page is on SingleStep or Multi-Step.
Monitoring Performance
For efficient ESTUN E300 basic operation, regularly monitor the machine’s parameters via the control panel. Check real-time data for efficiency and accuracy. Use the data to make adjustments to improve operation time and productivity.
You can view the ports allocation, valve status and fault list on Status Monitor page.
- Press and hold START key for 3 seconds when the machine is running.
- Press and hold STOP key for 3 seconds when the machine is not running.
Valve State
When you enter Status Monitor page, you can view the Valve Status tab, as shown in the figure below.

In the ESTUN E300 Basic Operation, understanding and monitoring the valve status is crucial for ensuring smooth machine functionality. On the Valve Status tab, operators can easily view the output status of the valves. A blue background on this tab indicates that the port is turned ON, while Blank indicates the port is turned OFF.
To further enhance the efficiency of ESTUN E300 Basic Operation, the current valve status is displayed on Curr. row. This row provides a real-time update of which valves are active. Additionally, other rows on the tab display how each valve is allocated in the corresponding process.
For example, if you have allocated the Press process to valves YV1 and YV3, when the machine is actively in the Press process, the Curr. Row will display the status as active for YV1 and YV3. This feature allows for precise tracking and control, optimizing the overall valve performance during the ESTUN E300 Basic Operation.
I/O State
Press arrow key RIGHT on the Valve Status tab, you can view the IO Status table, as shown in the figure below.
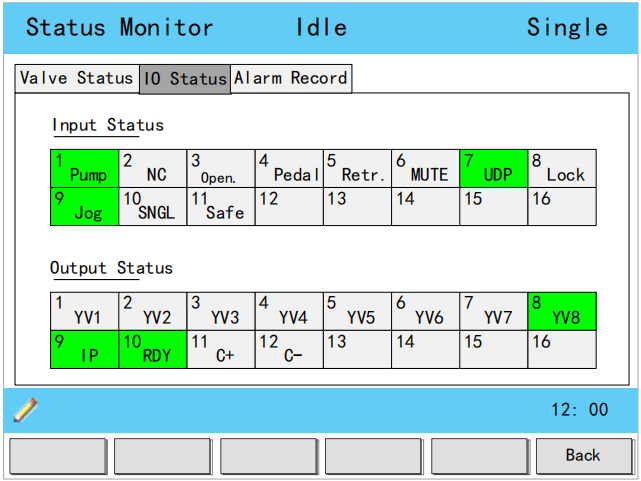
Green background indicates the port is turned ON, while Blank indicates the port is turned OFF.
Alarm History
Press arrow key RIGHT on the IO Status tab, you can view the Alarm Record table, as shown in figure below.
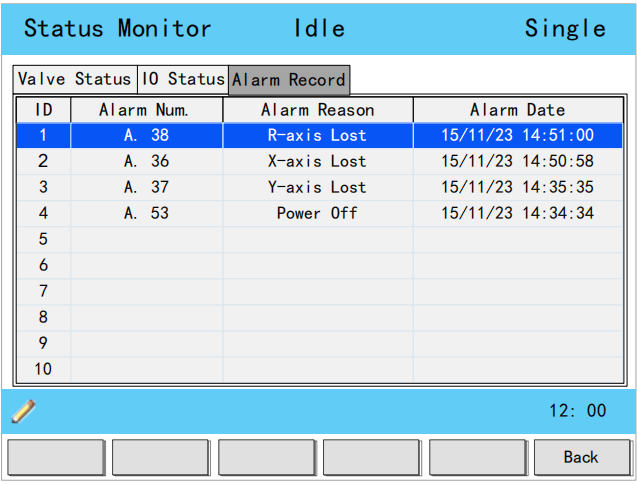
- ID: numbering for the alarm list, descending sort by Alarm Date, i.e. ID 1 is the latest fault message.
- Alarm Num: to show the code of the fault.
- Alarm Reason: to show summary record of the fault.
- Alarm Date: to show when this fault occurred.
Maintaining Constant Performance
The commonly used parameters are displayed on Constant page, as shown in the figure below.
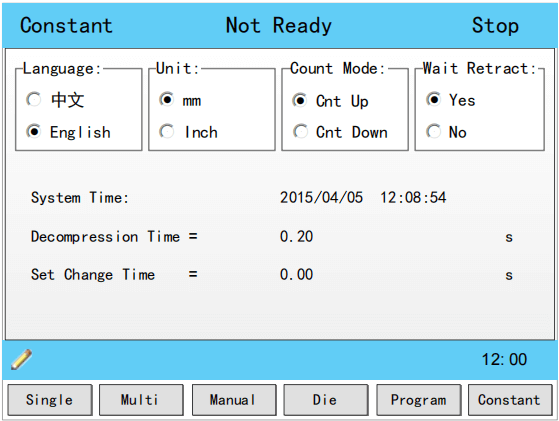
Below are the explanations of some parameters.
- Language: Select a desired language for the pages.
- Unit: Select a desired length scale for the dimensions. E300 can convert the current dimensions automatically when you change this parameter.
- Count Mode: Select a desired stock count mode.
- To select Cnt Up, the stock counter in production mode is increased by 1 after each product cycle.
- To select Cnt Down, the stock counter in production mode is decreased by 1 after each product cycle. When the counter has reached 0, the control is stopped.
- Down counting can be useful if a pre-planned quota must be produced. Up counting could be used to give a report on production progress.
- Wait Retract: In the case of a retract, let the Y-axis wait until the retract is finished.
- To select Yes, when the Y-axis reaches the clamping point, the Y-axis is stopped and the retract is started. When the retract is completed, the Y-axis moves on.
- To select No, the retract is started when the Y-axis passes the clamping point, the Y-axis does not stop.
- System Time: Set to a proper time for the system. The format is yyyy/MM/dd HH:mm:ss. For example, 2015/11/23 14:51:00.
- Decompression Time: Set the duration for the decompression process. This parameter affects the time for tuning ON the valve of Decmp.
- Set Change Time: Set a waiting time for entering next step when the previous step is completed.
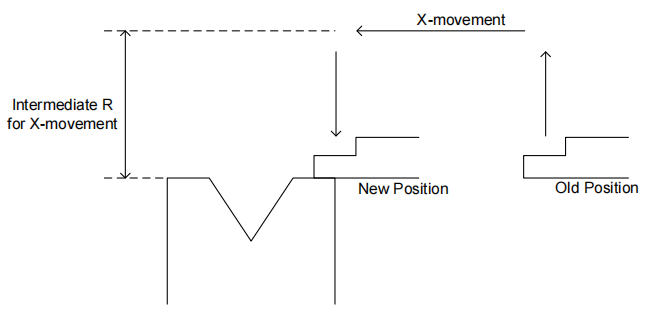
- Intermediate R: Temporary position for the R-axis, to avoid collision as a result of movement of the X-axis. The value 0 disables this functionality. When programmed not equal to zero this position will be active when the X-axis has to move inside the safety zone of the die. The sequence will be as follows:
- a. The R-axis is moved to the intermediate position;
- b. then the X-axis is moved to its intended position;
- c. finally the R-axis is moved to its intended position.
Frequently Asked Questions(FAQ)
How can I monitor the valve status during ESTUN E300 Basic Operation?
During the operation, you can view the valve status on the Valve Status tab. A blue background indicates that a port is ON, while a blank background signifies it is OFF. The “Curr.” row shows the active valves in real-time, which helps in monitoring ESTUN E300 Basic Operation effectively.
What should I do if an alarm is triggered during the ESTUN E300 Basic Operation?
If an alarm occurs, check the alarm code on the display panel. Address the issue as outlined in the operation manual, such as clearing obstructions or adjusting settings. Once resolved, press the reset button to clear the alarm and resume normal operations.
Can I adjust the settings during the ESTUN E300 Basic Operation, and how?
Yes, adjustments to settings can be made through the control panel. It is crucial to ensure that any changes comply with safety protocols and operation guidelines to maintain stability and efficiency during ESTUN E300 Basic Operation.
Conclusion
Mastering the ESTUN E300 Basic Operation involves understanding critical processes such as starting and stopping the machine, handling alarms and resets, and monitoring and maintaining valve statuses. By following the steps outlined in this guide, you can ensure efficient and consistent performance from your ESTUN E300, minimize downtime, and enhance operational productivity.
For further assistance or more detailed information, please feel free to contact our expert team at HARSLE. Our comprehensive documentation library and dedicated support staff are available to help you optimize your machinery’s performance and address any operational queries you may have.


