


Navigating the ESA S640 Summary Bends page can seem daunting at first, but it’s simpler than you might think. If you’ve been searching for a straightforward guide to understanding ESA S640 Summary Bends, you’re in the right spot. Whether you’re a seasoned professional or new to using the ESA S640 system, I’ll guide you through the essentials of this page. The core of this guide is to demystify the ESA S640 Summary Bends process, helping you to efficiently utilize its features for your metalworking projects. By the end of this article, you’ll have a clear understanding of how to optimize your workflow using the ESA S640’s comprehensive summary page. Let’s dive into how you can make the most out of this powerful tool.
Understanding the ESA S640 Summary Bends Interface
What is the ESA S640 Summary Bends Page?
The ESA S640 Summary Bends page is a comprehensive interface that allows users to view and edit all the bends of the current program simultaneously. This page, displayed in a table format, organizes the data such that each column corresponds to a bend, while each row represents specific data points for these bends.
Accessing the ESA S640 Summary Bends Page
Step 1: Navigating from the Editor Page
To enter the ESA S640 Summary Bends page, start from the Editor page. Press the appropriate button to open the menu and select the item labeled 10>> Summary Bend using the scroll bar. This action will open the summary bend page, making it readily accessible for review and modifications.

Step 2: Identifying Key Information
The page contains the following key information:
- The heading of each column contains the progressive number of the bend within the program.
- The first column on the left describes the values associated with each row.
- The value currently selected is highlighted with a yellow background, helping you quickly locate your focus area.
- Indications of the program name selected and the bend selected from the total number of bends in the current section are visible for faster reference.
- Indications of the current section compared to the total number of sections in the program.
You can also utilize various function keys for efficient navigation:
- Use the [New Program] function key to create a new program.
- Use the [Next Page] and [Preceding Page] function keys to navigate through multiple pages of data.
- Use the [Change Section] function key to shift your current selection to the first bend of the next section.
This setup is intentionally designed to help you swiftly identify and navigate between different bends, ensuring greater ease of use and enhanced productivity.
Utilizing the ESA S640 Summary Bends Functionality
How to Shift Selections within the Program
To move the selection from one bend to another, simply press the left and right arrow keys. If the selection is at the last bend and you press the arrow button again, a new bend will automatically be added, allowing for seamless program expansion.
Modifying Values in the ESA S640 Summary Bends Page
To change a value, navigate to the desired cell by touching it with your finger. Enter the new value using the “soft keyboard” and confirm by selecting “Ok”. The selection will automatically move to the next field, simplifying the editing process.
Creating and Managing Programs
How to Create a New Program
To create a new numeric program from the ESA S640 Summary Bends page, start by pressing the [New Program] key.
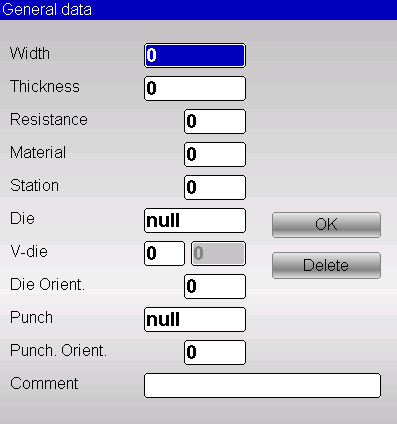
This action will open a window, prompting you to enter essential general program data. Follow these steps for each required entry:
- Enter the width of the metal sheet to be bent by touching the corresponding field and selecting [Ok].
- Enter the thickness of the metal sheet in the same manner, ensuring accurate data input.
- Input the resistance of the material to be bent. Once entered, the material properties will be automatically calculated based on this resistance.
- Select the die from the list by touching the field and pressing [Ok]. Ensure the die has already been drawn.
- Enter the V-die associated with the chosen die for the bend. If the die has more than one V-die, specify which one to use; if only one is available, simply enter 1.
- Choose the punch from the list, again ensuring it has already been drawn, and confirm by pressing [Ok].
- Add a comment if desired for additional context or notes about the program.
- Select the [Ok] button to confirm and proceed.
Finally, enter the “X1 posit” and “Alfa Y1” data by touching the fields. These entries will automatically calculate all other bend-related data, streamlining the programming process.
Saving and Naming Your Program
After data entry, save your program by pressing the designated button. A prompt will appear to enter the program’s name. Enter the name, select the [Ok] button, and complete the creation process. This ensures that all entered data are saved accurately for future reference.
Enhancing Navigation and Efficiency
Utilize keys like [Next Page], [Preceding Page], and [Change Section] to navigate through vast data efficiently. These tools are essential for users managing multiple sections or programs, ensuring quick access to the correct information without unnecessary navigation.
If enabled, default data allow for automatic creation of bends with pre-entered data, speeding up the setup process. This feature is particularly useful for users dealing with repetitive tasks, reducing the time needed for data entry and increasing overall productivity on the ESA S640 Summary Bends page.
Frequently Asked Questions(FAQ)
What information does the ESA S640 Summary Bends page provide?
The ESA S640 Summary Bends page provides detailed information about each bending operation, including bend angles, material specifications, and tooling requirements. This data helps you review and optimize your bending processes efficiently.
Can I customize the settings on the ESA S640 Summary Bends page?
Yes, you can customize various settings on the ESA S640 Summary Bends page to suit your specific operational needs. Adjust parameters such as bend sequence, tooling adjustments, and material thickness to align with your project requirements.
What should I do if I encounter errors on the ESA S640 Summary Bends page?
If you encounter errors on the ESA S640 Summary Bends page, start by checking for software updates and ensuring all system parameters are configured correctly. If issues persist, consulting the machine’s user manual or contacting support for assistance is recommended.
Conclusion
In conclusion, navigating the ESA S640 Summary Bends page involves understanding the key functions and features of the system. First, familiarizing yourself with the interface and its options is crucial for efficient use. Next, leveraging the self-teach functions and adjusting the settings manually are important steps in achieving precision for various bending situations. Finally, keeping the system regularly maintained and updated ensures consistent performance and accuracy. By mastering these steps, you can enhance your workflow and maximize the capabilities of the ESA S640 system.
For further assistance or inquiries, we encourage you to contact our team for detailed support. Additionally, be sure to explore other documentation on our site for more insights into optimizing your machine’s performance.


