


When it comes to optimizing your punching operations, mastering the ESA S875 Punches Setup is crucial for precision and efficiency. If you’re looking for comprehensive guidance on setting up punches, you’re in the right place. In this article, I’ll walk you through the essential steps to effectively configure your ESA S875 system, ensuring seamless integration into your workflow. By following this guide, you’ll be able to enhance your operational capabilities and troubleshoot common setup issues with ease. Whether you’re new to machining or a seasoned professional aiming to streamline your processes, this guide to ESA S875 Punches Setup will provide you with the insights you need to excel in your projects.
Accessing the Punches List
To work efficiently with the ESA S875 Punches Setup, begin by accessing the punches list. This can be done by:
- Pressing the key to display either the list of punches.

- If the dies list appears, press the key again to switch to punches.
The following window will appear in the case of punches:
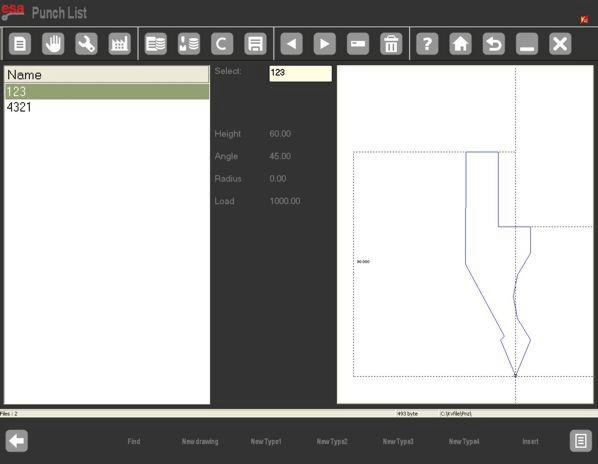
Key Features:
- The left window shows the list of punches.
- Central boxes provide data about the punch selected.
- The right window offers a punch preview.
How to Display the Preview
Ensuring that the correct tool is selected is crucial. The preview function, typically enabled by default, visually represents the punch.
- Press the key to access the menu.

- Select the [Preview] option to toggle the preview function.
Note: The preview allows easier identification of tools. If not required, it can be disabled and re-enabled later.
Managing Punches: Copy, Rename, and Erase
How to Copy a Punch
Duplicating an existing punch with a new name can be beneficial for modifications. Here’s how:
- Navigate to the punch to be copied.
- Press the key to access the menu and select [Copy].
- Enter the new tool name and confirm by pressing [ENTER].
How to Rename a Punch
Renaming Steps:
- Move to the target tool.
- Access the menu and choose [Rename].
- Input the new tool name and confirm with [ENTER].
How to Erase a Punch
Removing unused punches can streamline your setup:
- Select the punch you wish to remove.
- Press the key and hit [ENTER] to erase the punch.
Saving and Erasing Tools on USB
Save All Tools on USB
Allows you to save all the tools on USB so that they can then be transferred to another numeric control (useful when backup copies must be created). Comply with the procedure below:
- Insert a USB device into the port.
- Access the menu and choose [Save Tools].
Erase All Tools
When starting fresh or troubleshooting, you might need to erase all tools. Access the menu, select [Delete Tools], and press [ENTER] to clear the list after confirming the operation.
Tools List on USB and Saving to NC
Display Tools List on USB Device
To view tools on a USB device, insert it into the port. The list of punches and dies will be displayed, allowing you to manage directly from the USB.
How to Save All Tools from USB to NC
To transfer tools from USB to the numeric control, follow the previous steps for insertion, then select [Save Tools], ensuring all information is correctly updated to the system.
Adding and Drawing New Punches
How to Enter a New Punch
For adding new punches, follow these steps:
- Display the list of punches.
- Draw the punch with [New Drawing] or choose a preset type.
- Ensure you input the correct dimensions and save.
Punches to Draw
For intricate punch designs, use the drawing mask in an anticlockwise direction. Input specific measurements and angles for each section, utilizing graphic aids when necessary. Save the drawing once finalized, naming it appropriately.
Preset Punches and Their Utilization
Preset punches streamline operations by allowing minor modifications rather than starting from scratch. Adjust the dimensions and save your changes to use them efficiently across different projects.
With the ESA S875 Punches Setup Guide, setting up punches efficiently becomes second nature, ensuring your operations are precise and effective. From managing tool lists to customizing detailed punch drawings, each step builds your proficiency with the ESA S875 system.
Frequently Asked Questions(FAQ)
How can I view my punches list in the ESA S875 Punches Setup?
To view your punches list in the ESA S875 Punches Setup, navigate to the tool library section. Here, all available punches will be displayed in an organized list for easy access and management.
How do I copy a punch in the ESA S875 Punches Setup?
To copy a punch, select the punch you wish to duplicate and use the ‘Copy’ function within the ESA S875 Punches Setup interface. This will allow you to create an identical punch quickly.
What are preset punches, and how do they work in the ESA S875 Setup?
Preset punches are pre-defined tool configurations within ESA S875 Punches Setup. They offer a quick-start option for common punch needs, allowing you to select and utilize them without further setup.
Conclusion
Mastering the ESA S875 Punches Setup involves understanding and efficiently handling each component, from creating and managing your punches list to utilizing USB tools effectively. Key steps include displaying previews for better accuracy, copying or renaming punches to streamline operations, and erasing unnecessary punches to maintain an organized setup. Additionally, knowing how to save and transfer tools between the machine and a USB device can significantly enhance your workflow and ensure data consistency.
By leveraging these functionalities, you can optimize the performance and reliability of your ESA S875 system, ultimately boosting your productivity and minimizing any potential challenges that may arise during operation. To take full advantage of the ESA S875 Punches Setup, we encourage you to consult our comprehensive documentation or reach out to our expert team for personalized assistance. Whether you are looking for more detailed guides or have specific questions, our professionals are ready to support you every step of the way. For further exploration, consider accessing additional documentation available on our website to enhance your understanding and operational success.


